
Explore the controls
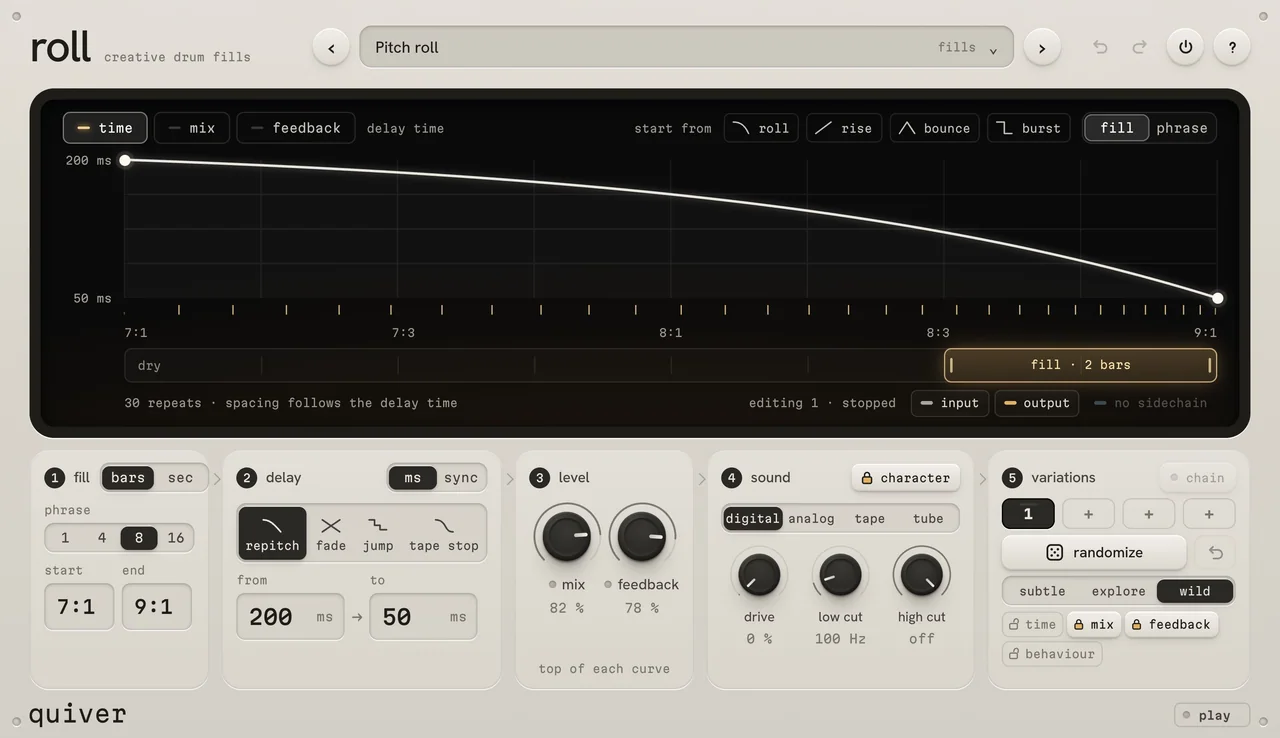 PresetsRevert / Undo / RedoBypass / Help / LicenceCurve lanesStarting curveFill / Phrase viewCurve editorFill windowAudio tracesPhrase lengthFill start and endms / syncDelay behaviourFadeJumpTape StopFrom / ToMixFeedbackCharacterKeep CharacterDriveLow CutHigh CutVariationsChainRandomizeRevert / Undo / RedoRandomize intensityPadlocks
Every control has a reference below, including settings found in other panels.
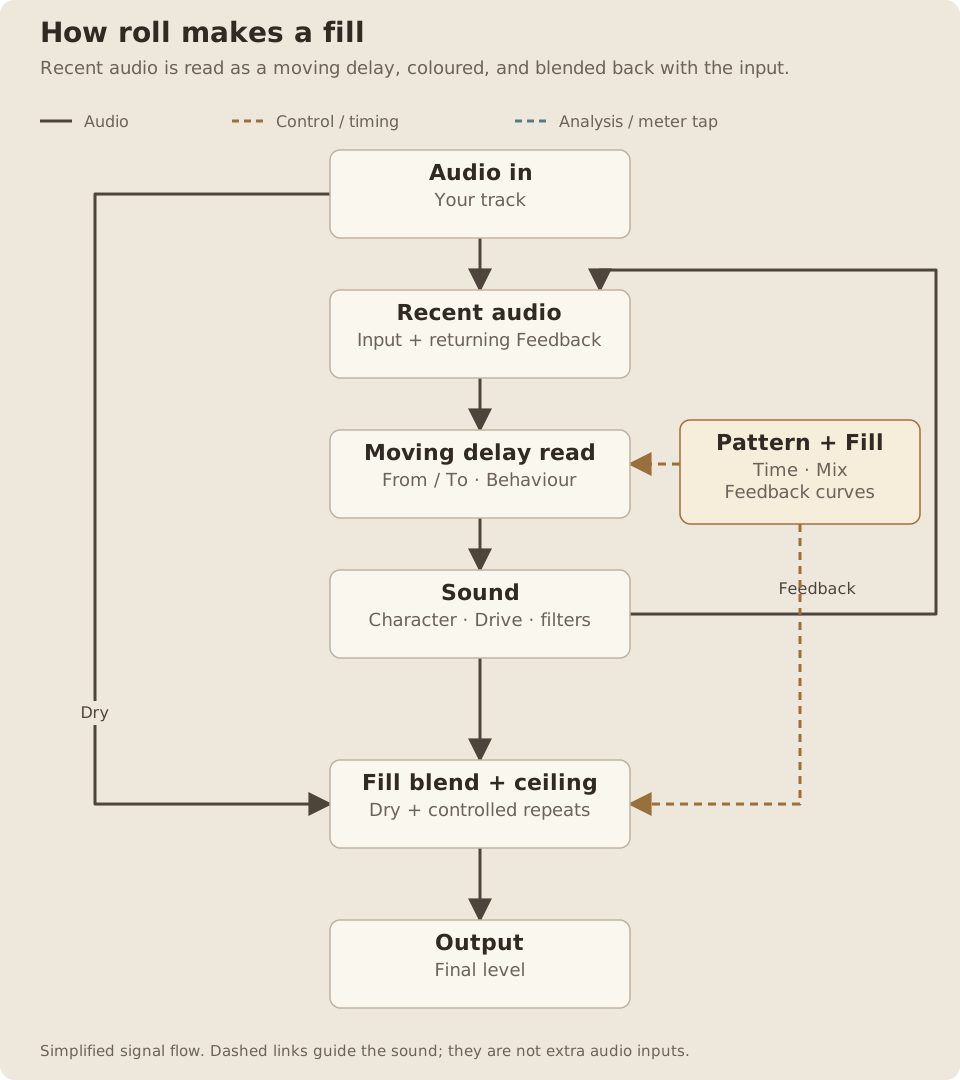
How the sound travelsSignal flow and control paths
How roll makes a fill
Recent audio is read as a moving delay, coloured, and blended back with the input.
Read the path
- The input enters recent-audio memory and also keeps a dry path.
- The Time curve and Delay behaviour move the read position, making the repeats and pitch movement.
- Sound colours and filters the repeated audio. Feedback returns that coloured sound to memory.
- The Fill curves set the repeat blend; the fill ceiling controls the repeats before Output.
- Feedback recirculates the coloured repeat, before the final dry/wet blend.
- The fill ceiling turns down the repeat contribution when needed; it does not turn down the original dry audio.
- Bypass restores dry audio and ignores Output. Outside an active fill, the repeat blend and feedback close.
roll makes fills from the audio already playing. It keeps part of a phrase dry, then moves through drawn delay, mix and feedback curves inside a fill window. Use it for accelerating rolls, pitched repeats, broken glitches, slapback and tape stops.
It is an audio effect. Put it on a drum track, after a drum instrument, or on a bus with the drums. For installation and activation, see Getting started.
Quick start
Something unclear?- Put roll after your drums and start the DAW.
- Choose Pitch roll to hear an eight-bar phrase: six dry bars followed by a two-bar fill moving from 200 ms to 50 ms.
- In Fill, set the phrase length and drag the fill strip to place the fill.
- In Delay, choose a behaviour and set its From and To endpoints.
- Adjust Mix and Feedback to set the strength and persistence of the repeats.
- Click + in Variations to keep a copy, then draw another version or use Randomize.
Interface
Something unclear?Knob reset values describe the settings used by a double-click reset. The opening preset and your saved projects can use different values.
The five modules follow the order in which you build a fill: 1 Fill, 2 Delay, 3 Level, 4 Sound, 5 Variations. The large window above them shows the selected curve over the audio, with the fill placement strip below it.
The top row holds presets, undo, redo, bypass and help. The bottom line shows transport and status messages, plus the licence button when activated.
Fill placement
Something unclear?Phrase length
Something unclear?- Range
- 1, 4, 8 or 16 bars
- Default / reset
- Parameter baseline: 1 bar
- Starting point
- Try 8 bars for a fill at the end of a longer phrase.
Choose 1, 4, 8 or 16 bars. A bar in roll is four beats. The phrase is aligned to your DAW’s song position, so the same passage produces the same fill placement on repeated playback.
Phrase length is shared by all variations. A chain moves to the next variation after each whole phrase.
Start and end
Something unclear?- Range
- Start 0–99.99%; duration 0.01–100% of the phrase
- Default / reset
- Parameter baseline: start 0%; duration 100%
- Starting point
- Place the fill over the final beat of the phrase.
The highlighted strip below the window marks the fill. Drag its body to move the entire fill, or drag either edge to shorten or lengthen it. Moving or stretching the fill carries its curves with it.
You can also type the start and end fields. In bars:beats, 7:1 means bar seven, beat one. Decimal beats allow positions between beats, such as 7:1.5. Switch to sec to enter positions in seconds within the phrase.
Before and after the fill, the original audio stays dry. roll must have heard the source before it can repeat it: starting playback partway into a fill cannot recover audio from before the DAW started.
Fill and phrase view
Something unclear?- Range
- Fill or full phrase
- Starting point
- Use phrase view to place the fill, then zoom into it to edit.
Fill zooms the large window into the fill. Phrase shows the whole phrase and its dry regions. This changes the view, not the fill’s timing.
Delay behaviour and timing
Something unclear?Repitch
Something unclear?- Range
- Repitch, Fade, Jump or Tape Stop
- Default / reset
- Reference: Repitch
- Starting point
- Use Repitch with a rising Time curve for a pitched roll.
The pitch follows the moving delay time. Shortening the delay raises the pitch; lengthening it lowers the pitch. Choose this for swooping, scratching or accelerating pitched rolls.
- Starting point
- Choose Fade for repeats that change position without a continuous pitch glide.
Crossfades between delay positions. Time changes feel smoother, with less of the continuous pitch sweep of Repitch.
- Starting point
- Choose Jump for fractured, abrupt rhythm changes.
Moves sharply between delay positions for fractured repeats and more abrupt changes. Use it when you want the edits to be part of the sound.
Tape Stop
Something unclear?- Starting point
- Choose Tape Stop and draw a fall toward stopped playback.
The Time curve becomes a playback-speed curve. 100% is normal speed and 0% is stopped. The endpoint fields become start speed and end speed.
Draw a downward curve to slow the audio, or add points to change how it slows. The milliseconds / sync selector is inactive in Tape Stop, because the curve is controlling speed rather than delay time.
From and To
Something unclear?- Range
- 5–3000 ms in endpoint entry; synced 1/64 to 1 bar
- Default / reset
- Parameter baseline: 20–340 ms bounds; synced 1/16 T–1/4 T
- Starting point
- Try 1/8 to 1/32 endpoints in Sync for a roll that speeds up.
- Available when
- Endpoints become Low/High for a curve that reverses direction; Tape Stop uses speed instead.
For a curve sweeping from one end to the other, From and To set the delay at the beginning and end. In milliseconds, the available endpoints are 5–3000 ms.
A 200-to-50 ms movement makes repeats closer together as the fill progresses. Reverse those endpoints for widening repeats.
For a curve that returns toward where it started, such as a bounce, the fields become Low and High. These bound the shortest and longest delay reached by the curve.
Milliseconds and sync
Something unclear?- Range
- Milliseconds or Sync
- Default / reset
- Reference: milliseconds
- Starting point
- Choose Sync to keep the endpoint note lengths when tempo changes.
- Available when
- Unavailable in Tape Stop.
ms uses fixed times. sync selects musical note lengths that follow the DAW’s tempo, including straight, triplet (T) and dotted (D) notes. Click an endpoint to choose the note value.
Sync sets the endpoints; it does not quantize every position along the curve. Repitch still moves continuously between its synced endpoints.
Curve window
Something unclear?Time, Mix and Feedback lanes
Something unclear?- Range
- Three editable curve lanes
- Starting point
- Start with Time, then draw Mix upward to bring the fill in.
Select Time, Mix or Feedback above the window to edit that curve. Each has a different job:
- Time moves the delay between its endpoints, or controls speed in Tape Stop.
- Mix shapes how much processed signal is heard inside the fill.
- Feedback shapes how much of the delayed sound feeds back for further repeats.
The Mix and Feedback knobs set the maximum for their curves. The window draws each curve at its actual height under that maximum. You can drag the maximum in the window as well as turn its knob.
Click a Mix or Feedback knob’s label to show its curve. Hovering or adjusting the knob also previews that lane.
Draw and bend
Something unclear?- Range
- 2–16 curve points
- Starting point
- Use a two-point rise before adding extra bends.
- Drag a point to move it.
- Drag the line between points to bend the segment.
- Double-click to add a point or remove an interior point.
- Hold Shift for finer adjustment.
The curve’s horizontal position determines when the movement happens within the fill. Its vertical position sets the amount for the chosen lane.
Start from
Something unclear?- Range
- Roll, Rise, Bounce or Burst
- Starting point
- Choose Roll as a starting curve, then edit its last point.
The roll, rise, bounce and burst buttons load a starting shape into the selected lane. You can then change its points and bends. These are starting curves, not separate playback modes: Delay behaviour still determines how the Time movement sounds.
Repeats and audio traces
Something unclear?- Range
- Show or hide available traces
- Starting point
- Show Input and Output while comparing the fill.
- Available when
- Sidechain is a visual reference only.
The marks under the Time curve show where the repeats fall. Closer spacing means a shorter delay and faster repeats. The readout reports the repeat count; in Tape Stop it describes the speed movement instead.
Input and output waveforms help compare the original drums with the result. The display’s trace labels control their visibility. Showing or hiding a trace changes only the display.
Route audio into roll’s sidechain input to see a separate Sidechain reference waveform. It is visual only; it does not trigger the fill or enter the mix. If no sidechain is routed, the label reads no sidechain and is inactive.
Level knobs
Something unclear?- Range
- 0–100%
- Default / reset
- Reset: 100%
- Starting point
- Try 50% while keeping the original groove underneath.
- Available when
- The Mix curve must rise above zero in the fill.
0–100%. Sets the top of the Mix curve. At 0%, you hear the dry signal. Raising it allows more of the delayed sound through where the Mix curve is open.
The dry sections outside the fill remain dry. To fade the effect into the fill, draw the Mix curve upward rather than changing the placement.
Feedback
Something unclear?- Range
- 0–92%
- Default / reset
- Reset: 35%
- Starting point
- Start at 25% for a short trail.
- Available when
- The Feedback curve scales this maximum.
0–92%. Sets the top of the Feedback curve. At 0%, delayed audio is not recirculated for further feedback repeats. Higher values make repeats continue and build up through the fill.
Draw a rising Feedback curve to let the fill gather momentum, or lower the curve near the end to let it settle.
Peak control
Something unclear?roll limits the contribution of the repeats against the drums’ recent peak. It turns down the repeats rather than turning down the original drums. Mix and Feedback change the movement and density without simply making the fill peak higher than the recent source.
Changing knob values
Something unclear?Drag up or down. Hold Shift for fine changes. Click the displayed value, or double-click the knob, to type a value. Arrow keys adjust a focused knob; Shift gives smaller increments, and Home resets it.
Sound controls
Something unclear?Sound changes apply to the repeats. The original drums are not passed through the delay’s Low Cut and High Cut filters.
Character
Something unclear?- Range
- Digital, Analog, Tape or Tube
- Default / reset
- Reference: Digital
- Starting point
- Compare Tape against Digital on the same fill.
- Digital: clear repeats and sharp detail. Drive adds saturation.
- Analog: softer repeats that become darker as they feed back.
- Tape: rounded attacks with increasingly saturated repeats.
- Tube: driven, asymmetric saturation with a fuller harmonic edge.
These are original sound characters, rather than replicas of named hardware. Character is independent of Delay behaviour: you can combine Repitch, Fade, Jump or Tape Stop with any character.
Drive
Something unclear?- Range
- 0–100%
- Default / reset
- Reset: 0%
- Starting point
- Try 15% for denser repeats.
0–100%. Adds saturation to the delayed sound. Start low for colour, then raise it to make the repeats denser and more distorted. The selected character changes the kind of saturation you hear.
Low Cut
Something unclear?- Range
- Off (0 Hz) to 1 kHz
- Default / reset
- Reset: Off; opening Pitch roll preset uses 100 Hz
- Starting point
- Try 100 Hz to stop kick energy building up in the repeats.
Off, or up to 1000 Hz. Removes low frequencies from the repeats and their feedback path. Use it to stop kick energy accumulating while the main drums keep their low end.
High Cut
Something unclear?- Range
- 1–20 kHz; 20 kHz reads Off
- Default / reset
- Reset: Off (20 kHz)
- Starting point
- Try 5 kHz for darker repeat tails.
1000 Hz to Off. Removes high frequencies from the repeats and their feedback path. Lower values make repeated hits darker. The top setting, 20 kHz, reads off.
Click a filter’s displayed value to enter a frequency. Values with Hz or kHz are accepted.
Variations and randomize
Something unclear?Four variation slots
Something unclear?- Range
- Four saved slots
- Starting point
- Copy a working fill before making its alternate.
Click + to copy the edited variation into an empty slot. Select a number to edit that variation. The pressed slot is the edit target; its light shows when it is playing.
Right-click a saved slot to replace it with the edited variation or remove it. You can keep one original and several alternatives without losing their individual settings.
Fill placement, curves, delay behaviour and Sound settings belong to each variation. Phrase length, delay endpoints, the Mix knob and the Feedback knob are shared.
Chain
Something unclear?- Range
- Off or On
- Default / reset
- Reference: Off
- Starting point
- Save two variations, then enable Chain to alternate phrases.
- Available when
- Needs at least two saved variations.
Save at least two variations, then turn on Chain to play them in slot order, one whole phrase each. Empty slots are skipped. With Chain off, the selected variation repeats.
You can edit a variation while another one plays. Watch the slot light when comparing an edit with the sound.
Randomize
Something unclear?- Starting point
- Lock the Mix curve while exploring Time shapes.
Randomize writes a new version of the edited variation. It changes curves, behaviour and character according to the amount and open padlocks. Fill placement and knob levels stay fixed.
The saved result repeats during playback. Randomize does not make a fresh random decision every time the phrase comes round.
Subtle, Explore and Wild
Something unclear?- Range
- Subtle (15%), Explore (50%), Wild (100%)
- Default / reset
- Reference: Wild (100%)
- Starting point
- Choose Subtle when refining an existing fill.
- Subtle gently reshapes the existing points.
- Explore creates new shapes with a moderate amount of variation.
- Wild allows more extreme new shapes.
Try Subtle when the fill is close to what you want, or Explore and Wild when searching for a different movement.
Padlocks
Something unclear?- Range
- Open or locked
- Default / reset
- Reference: Mix, Feedback and Character locked; Time and Behaviour open
- Starting point
- Lock Behaviour to keep Tape Stop while changing its curve.
A closed, lit padlock keeps its setting when randomizing. The variation module has separate locks for Time, Mix, Feedback and Behaviour. The Sound module has the Character lock.
Lock the Mix and Feedback curves to explore timing while keeping the fill’s dynamics. Lock Time and Behaviour to explore how a familiar movement enters and builds.
Revert, undo and redo
Something unclear?- Starting point
- Use Undo immediately after a change you want to compare.
Revert steps back through the last three randomizations; the small number shows how many are available. The top-row undo and redo buttons handle ordinary edits as well.
Presets and common controls
Something unclear?Choose and save presets
Something unclear?- Starting point
- Save your fill under a new name before trying other presets.
Click the preset name to open the menu; the left and right arrows move through presets. Use save preset… to store the full sound and its variations.
Saving under the name of one of your own presets asks you to confirm replacement. Factory sounds remain available. Right-click a user preset to rename it, move it to the trash, or show its folder. Your DAW also saves the sound and variations with the project.
Share and back up presets
Something unclear?Choose open folder in the preset menu. Your presets are .qpreset files; send one to another roll user, or keep copies as a backup. Drop a roll .qpreset file onto the plugin to add it to your menu.
The user preset folders are:
- Mac:
~/Library/Application Support/Quiver/slip/Presets/User - Windows:
%APPDATA%\Quiver\slip\Presets\User
The folder name is slip, even though the plugin is called roll.
Bypass, help and licence
Something unclear?- Range
- Bypass Off or On
- Default / reset
- Reference: processing active
- Starting point
- Compare the fill with bypass after a complete phrase.
The power button bypasses the effect. Start the DAW to hear the phrase and fill. The help button opens a built-in overview. The licence button opens activation and account details; while roll is not activated, it passes the original audio through.
Use Command-Z on Mac or Ctrl-Z on Windows to undo an edit; add Shift to redo. These shortcuts do not take over while you are typing in a text field.
For activation, updating and downloads, see Getting started.
How-tos
Something unclear?Add a fill at the end of eight bars
Something unclear?- Set the phrase to 8 bars.
- Set Fill start to 7:1 and move the end to the end of the phrase, or drag the fill over its last two bars.
- Choose Repitch with a long From delay and a shorter To delay, such as 200 ms to 50 ms.
- Choose the roll starting shape in the Time lane.
- Adjust Mix, then add Feedback until the fill has the density you want.
- Play from before the fill so roll can capture the drums it will repeat.
Make a fill build without pitching it continuously
Something unclear?- Choose Fade rather than Repitch.
- Use sync and set a longer starting note and shorter ending note.
- Draw an upward Mix curve to bring the repeats in.
- Draw an upward Feedback curve to add density toward the end.
- Use Low Cut to keep kick energy from building up in the repeats.
Make a tape stop
Something unclear?- Place the fill where the stop should happen.
- Choose Tape Stop.
- Set start speed to 100% and end speed to 0%.
- Draw the Time curve to choose whether the slowdown is gradual or happens mostly at the end.
- Adjust the Mix curve to decide how strongly the stopped sound replaces the dry drums.
Keep a reliable fill and alternate it with another
Something unclear?- Copy the current variation into an empty slot.
- Close the Mix, Feedback and Character padlocks if you want to preserve them.
- Select Subtle and click Randomize in the copied variation.
- Use Revert if you prefer an earlier roll.
- Turn on Chain to alternate the saved variations, one phrase each.
- Save a preset to keep the set together.
Troubleshooting
Something unclear?I only hear the original drums
Something unclear?Confirm the DAW is playing, bypass is off and the licence is active. Check that the playhead has reached the fill window. Raise Mix and make sure its curve is above zero. Outside the fill, dry audio is expected.
The fill starts without the repeats I expected
Something unclear?Start playback before the fill. roll cannot repeat source audio from before playback began. A longer lead-in gives it the material for longer delay times.
Changing a curve does not change the sound
Something unclear?Check the selected lane, its knob maximum, and the playing variation. A Mix or Feedback curve under a zero maximum has no effect. With Chain on, the variation being edited may not be the one you hear.
The timing changes when I move the song playhead
Something unclear?The phrase follows the DAW’s song position. This makes repeated playback land on the same fill. Set phrase length and placement for the passage you are playing, and remember that a bar in roll is four beats.
The endpoint fields show Low and High
Something unclear?The Time curve returns toward its starting side, so roll shows its shortest and longest delay bounds rather than treating the first and last points as a one-way sweep.
Milliseconds and sync are inactive
Something unclear?You are in Tape Stop. That mode controls playback speed. Choose Repitch, Fade or Jump to set delay-time endpoints.
Chain is dimmed
Something unclear?There is only one saved variation. Click + to copy it into a second slot before enabling Chain.
For installation, plugin scanning, activation or account help, see Getting started or support.