
Explore the controls
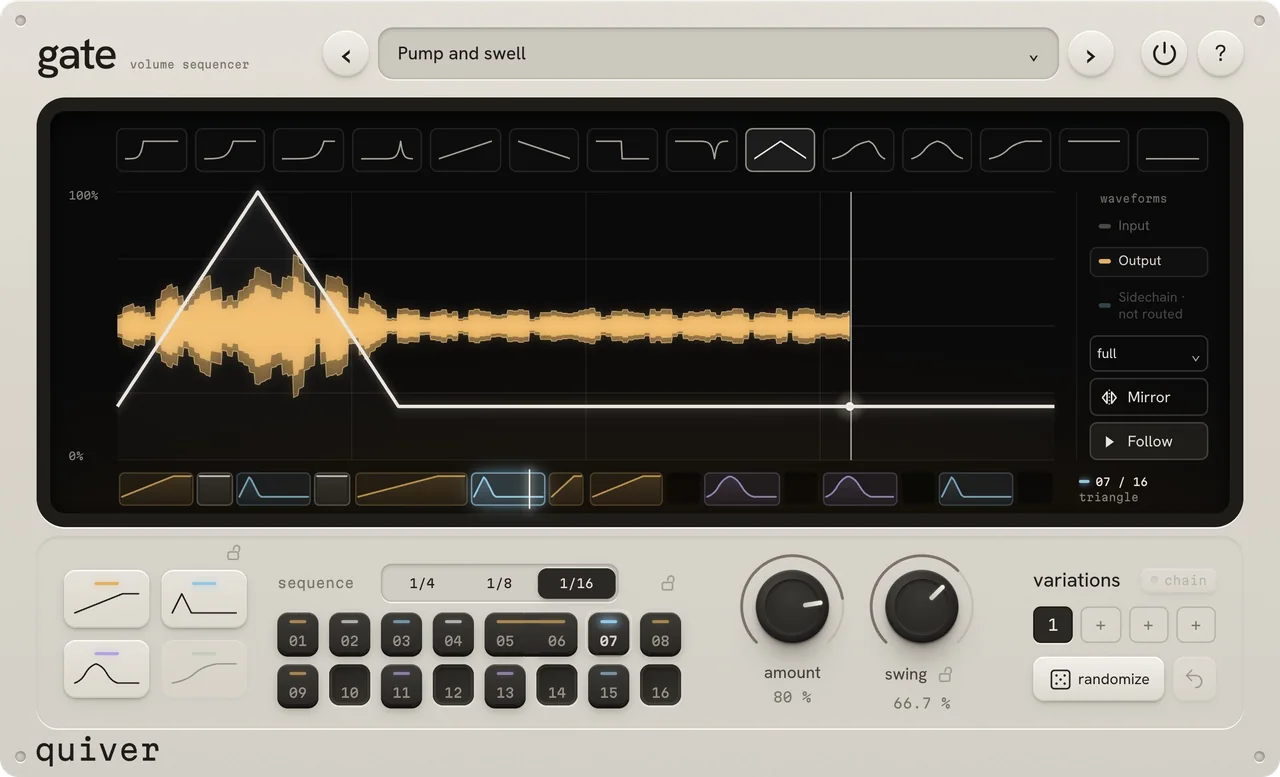 PresetsBypass / Help / LicenceStarting shapeCurve editorAudio tracesFocusMirrorFollow / HoldCurve slotsKeep curvesDivisionStep assignmentKeep divisionAmountSwingVariationsChainRandomizeRevert / Undo
Every control has a reference below, including settings found in other panels.
How the sound travelsSignal flow and control paths
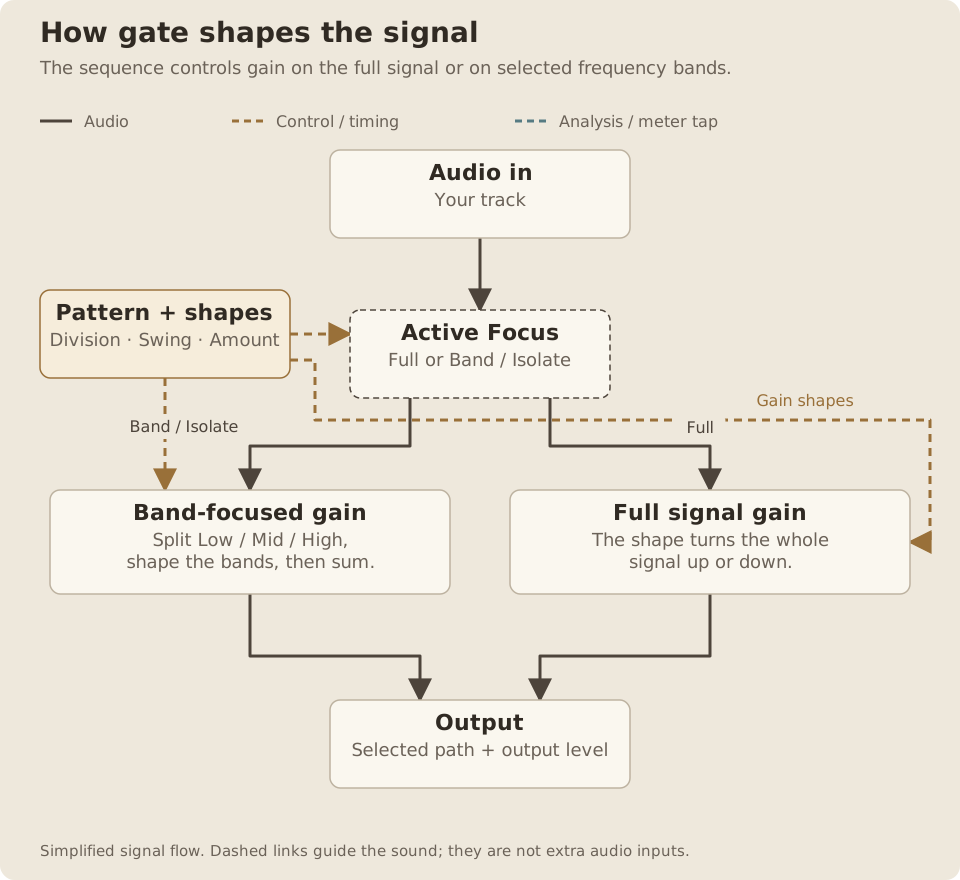
How gate shapes the signal
The sequence controls gain on the full signal or on selected frequency bands.
Read the path
- Incoming audio reaches the active Full or band-focused path.
- The assigned shapes and Amount set the gain, following Division, Swing and the sequence.
- The selected path reaches Output. Bypass restores the input without the Output trim.
- Full and band-focused processing are alternative paths, not a permanent dry/wet blend.
- Band and Isolate shapes use the Low and High crossovers. A band path is active only when a played step actually uses one of those shapes.
gate turns a sustained sound into a rhythm. Four editable curves can open, close, duck or swell the volume, with a different curve on each step. Frequency focus lets the same curves work on the lows, mids or highs.
gate is an audio effect. Put it after an instrument, on an audio track, or on a bus. It needs incoming audio and your DAW’s transport running. For installation and activation, see Getting started.
Quick start
Something unclear?- Load gate after a pad, sustained bass or other sound that keeps playing.
- Start your DAW and choose a preset with the arrows beside the preset name.
- Choose 1/4, 1/8 or 1/16 in sequence. These divide one four-beat bar into 4, 8 or 16 steps.
- Click one of the four coloured curve slots, then click steps to give them that curve.
- Drag points in the large window to change the curve. Lower Amount for a gentler rhythm.
- Click + in variations to keep a copy before trying another pattern.
Interface
Something unclear?Knob reset values describe the settings used by a double-click reset. The opening preset and your saved projects can use different values.
The upper window shows a volume curve over the audio. The strip directly below it shows the pattern across the bar. Below that are four coloured curves, the sequence pads, Amount and Swing, and four variation slots.
The preset name, preset arrows, bypass and help sit across the top. The bottom line shows the connection or transport state and the licence button when activated.
Curve editor
Something unclear?Four curve slots
Something unclear?- Range
- Four editable slots
- Starting point
- Choose amber, then click the steps that should use it.
The amber, blue, violet and green slots each hold one curve. Every step assigned to a colour uses that colour’s curve. Editing a curve therefore changes all the steps that use it.
Click a slot to select it for editing and assignment. Click it again, or press Escape, to stop assigning it and follow playback again. With no slot selected, clicking a coloured step selects its curve.
The number keys 1–4 or letters A–D select the four slots when you are not entering text.
Draw and bend
Something unclear?- Range
- 2–16 curve points; gain 0–100%; bend −100 to +100%
- Starting point
- Start with two points and bend the segment for a smooth recovery.
The top of the window is fully open; the bottom is closed. A low-to-high curve produces a recovery or swell. A high-to-low curve closes the sound.
- Drag an interior point to move it.
- Drag the line between two points up or down to bend that segment.
- Double-click empty space on the curve to add a point.
- Double-click an interior point to remove it.
- Hold Shift while dragging for finer movement.
The first and last points keep their level when dragged horizontally. Use the shape’s interior points and Amount to control the depth.
Curve start and end
Something unclear?- Range
- Start 0–98%; length 2–100%
- Default / reset
- Reset: start 0%; length follows the slot’s starting curve
- Starting point
- Try an end at 55% of a quarter-note step for a pump.
Drag the first point, or the space before it, left or right to change where the curve begins within its step. Drag the last point, or the space after it, to change where the curve ends. Moving the start keeps the end in place.
This changes the curve’s timing without changing the number of sequence steps. On tied steps, the timing is relative to the whole tied run.
With the curve window focused, Left and Right move the end. Hold Alt to move the start instead, and Shift for smaller changes.
Shape starting points
Something unclear?- Range
- 14 editable starting shapes
- Starting point
- Choose Pump, then adjust its last point.
The fourteen thumbnails above the window load starting shapes into the curve being edited. They include pumping, pulsing, rising and falling shapes, plus full sustain and mute. Choose one, then draw your own changes.
Choosing a starting shape keeps that slot’s frequency focus and flip setting.
Mirror
Something unclear?- Range
- Normal; reversed in time; inverted; both
- Default / reset
- Reference: normal
- Starting point
- Click twice to turn a duck into a burst, then compare.
Successive clicks cycle through four versions of the selected curve:
- Reversed in time.
- Inverted in level, exchanging open and closed.
- Reversed and inverted.
- Back to the original orientation.
A duck can become a burst; a swell can become a dip. Drawing, choosing a starting shape or randomizing does not reset the flip setting.
Follow and Hold
Something unclear?- Range
- Follow or Hold
- Default / reset
- Opening view: Follow
- Starting point
- Use Hold while editing a curve that appears briefly.
Follow shows the curve of the step currently playing. Click it to hold the visible curve for editing; the button then reads Hold. Clicking a coloured curve slot also holds that curve.
While a selected curve plays, its latest audio continues to update. If you hold a sustain step, mute step or another variation’s bar, the view stays frozen. Click Hold, click the selected slot again, or press Escape to follow playback.
Sequence and steps
Something unclear?Division
Something unclear?- Range
- 1/4, 1/8 or 1/16
- Default / reset
- Parameter baseline: 1/4
- Starting point
- Start at 1/4 for one shaped step per beat.
1/4 gives four quarter-note steps per bar. 1/8 gives eight eighth-note steps. 1/16 gives sixteen sixteenth-note steps.
Each division remembers its own pattern. The first time you choose a division, gate carries the current pattern into it; returning later restores that division’s pattern. The four curves remain shared across divisions.
The bar follows your DAW’s song position. Moving the playhead changes where gate is in the pattern.
Assigning steps
Something unclear?- Range
- Four colored curves, sustain or mute
- Starting point
- Choose amber and put it on the first four quarter-note steps.
Select a coloured curve and click a sequence pad to assign it. Right-click a pad for the full assignment menu, including sustain and mute.
The narrow strip above the controls displays each step in its assigned colour. The playing step glows. Hovering a strip cell or pad highlights the matching position; clicking a coloured strip cell opens its curve for editing.
Sustain and mute
Something unclear?- Range
- Sustain or mute
- Starting point
- Use Sustain to leave one step fully open.
- Available when
- Whole-signal Sustain and Mute do not follow Amount.
Sustain passes the whole signal at full level. Mute silences it. These whole-signal assignments work independently of Amount. Adjacent sustain steps join without restarting a shaped envelope.
A coloured slot loaded with a Full sustain or mute shape behaves the same way. A coloured flat shape with frequency focus still has a band-specific effect, whose depth follows Amount.
Tie steps
Something unclear?- Range
- Runs inside one bar
- Default / reset
- Reference: untied
- Starting point
- Tie four sixteenths so one curve lasts a full beat.
Drag across neighbouring pads to tie them into one run. The selected curve, or the first pad’s curve, stretches across the entire run. This lets a single swell or duck last longer than one step.
Tied pads share one light, and the strip above shows them as one cell. Changing a pad in a tied run changes the run’s assignment. Right-click a pad to split the run there or tie it to the preceding step. A run cannot cross the bar line.
Frequency focus
Something unclear?- Range
- Full; duck lows/mids/highs; isolate lows/mids/highs
- Default / reset
- Reference: Full
- Starting point
- Start on Full before comparing band-specific effects.
Full applies the curve to the entire signal. Use this for a conventional volume gate or pumping effect.
Duck lows, mids or highs
Something unclear?- Range
- Duck low, mid or high band
- Starting point
- Try Duck lows to leave the upper tone present.
These choices apply the curve only to the chosen band. The other two bands stay open. Duck the lows to create rhythmic space under a bass, or duck the highs to pulse the brightness while leaving the body intact.
Isolate lows, mids or highs
Something unclear?- Range
- Isolate low, mid or high band
- Starting point
- Try Isolate mids at Amount 100% to hear the selected band alone.
These choices apply the curve to the chosen band and reduce the other two bands. At full Amount, you hear the shaped band on its own. Lowering Amount brings the other bands back and makes the effect gentler.
Focus belongs to each coloured curve. Shape choices, Mirror and Randomize keep it; presets and variations remember it.
Shared crossovers
Something unclear?- Range
- Each 20 Hz–20 kHz; automatically ordered
- Default / reset
- Reset: low/mid 200 Hz; mid/high 2.5 kHz
- Starting point
- Start at 200 Hz and 2.5 kHz, then move the low crossover around the bass.
- Available when
- Available when a playing step uses band focus.
Open the Focus menu and choose shared crossovers. Low / mid separates the low and middle bands; mid / high separates the middle and high bands. They start at 200 Hz and 2.5 kHz and are shared by all curves and chained variations.
Click a frequency to type a value. Units such as 200 Hz and 2.5 kHz are accepted. The two crossover frequencies are ordered automatically if they cross.
The crossover controls are inactive when no playing step uses band focus. Choose a focused curve and assign it to a step first.
Knobs
Something unclear?Amount
Something unclear?- Range
- 0–100%
- Default / reset
- Reset: 100%
- Starting point
- Try 50% for a gentler rhythm.
- Available when
- Dimmed when only whole-signal sustain, mute or flat curves are playing.
0–100%. Sets the depth of shaped curves. At 100%, the curve makes its full volume movement. Lower values keep more of the signal open; 0% removes that movement.
With frequency focus, 0% restores the neutral three-band signal, including when a focused curve is flat. Whole-signal sustain and mute assignments remain sustain and mute at every Amount setting.
Amount is shared by all variations. It is dimmed when the whole playing pattern consists of whole-signal sustain, mute or flat curves, because changing it would have no audible effect.
Swing
Something unclear?- Range
- 50–75%
- Default / reset
- Reset: 50% (straight)
- Starting point
- Try 58% at 1/16 for a relaxed feel.
- Available when
- Available only at 1/16.
50–75%. Delays alternate sixteenth-note steps. 50% is straight timing; approximately 66.7% gives triplet swing.
Swing is available only at 1/16. Quarter-note and eighth-note patterns remain straight, so the knob is dimmed at those divisions.
Changing values
Something unclear?Drag a knob up or down. Hold Shift for fine adjustment. Click its displayed value to enter a number. Host automation can control the musical parameters, including Amount, Swing, curve timing, focus and Chain. Drawn curve points are saved with the sound rather than recorded as automation.
Variations and randomize
Something unclear?Four variations
Something unclear?- Range
- Four saved slots
- Starting point
- Copy slot 1 before editing slot 2.
Click + to duplicate the current variation into an empty slot. Select a numbered slot to return to it. Edits are remembered as you make them.
Drag a saved variation onto another slot to copy it. Right-click a saved slot for replace or remove options. At least one variation remains.
Chain
Something unclear?- Range
- Off or On
- Default / reset
- Reference: Off
- Starting point
- Save two contrasting variations, then enable Chain.
- Available when
- Needs at least two saved variations.
With at least two variations saved, Chain plays them in slot order, one bar each, then repeats. Empty slots are skipped. The chain follows song position, so looping the same passage returns to the same variation.
The lit slot is the variation playing. The selected slot is the variation you are editing, which can be different. Follow shows the playing variation’s curves while the pads remain on the selected variation.
Switch Chain off to repeat the selected variation. Amount applies across the chain. The plugin’s bypass and host Output setting remain global; selecting a variation or preset does not reset them.
Randomize
Something unclear?- Starting point
- Close the rhythm locks before rolling new curves.
Randomize changes the selected variation’s division, swing, steps, ties and four curves, subject to the padlocks. It writes a new saved pattern; playback then repeats that result.
Padlocks
Something unclear?- Range
- Open or locked
- Default / reset
- Reference: all open
- Starting point
- Lock Division and Swing to keep a prepared groove.
A closed, lit padlock keeps its setting when randomizing:
- The sequence padlock keeps the division.
- The Swing padlock keeps the swing amount.
- The padlock beside the four curve slots keeps the curves.
The Swing padlock is inactive outside 1/16. Frequency focus and curve flip settings are preserved by randomization.
Revert and undo
Something unclear?- Starting point
- Use Revert after a roll you do not want to keep.
The button beside Randomize steps back through the last three randomizations. It becomes available after a roll. Use Command-Z on Mac or Ctrl-Z on Windows for ordinary edits; add Shift to redo.
Audio display and common controls
Something unclear?Input, Output and Sidechain traces
Something unclear?- Range
- Show or hide each available trace
- Starting point
- Show Input and Output to compare their rhythm.
- Available when
- Sidechain trace needs routed sidechain audio and never triggers gating.
Input is the incoming grey waveform. Output is the processed amber waveform. Their display scaling is linked so their shapes can be compared. Click a trace label to hide or show it.
Sidechain is a blue reference waveform from the plugin’s sidechain input. Route a kick or another track to that input to compare its timing with the gate curve. It is a visual reference: it neither triggers the gate nor mixes into the output.
The traces restart with each step or tied run. Holding a view changes what is displayed, not what is playing.
Presets
Something unclear?- Starting point
- Save an edited curve-and-pattern combination under a new name.
Click the preset name to choose a factory or user preset. The arrows step to the previous or next preset. Save your preset… stores the current sound under a name; your DAW also saves it with the project.
gate keeps the plugin’s bypass and host Output setting when loading a preset, so auditioning sounds does not unexpectedly change that output level.
Bypass, help and licence
Something unclear?- Range
- Bypass Off or On
- Default / reset
- Reference: processing active
- Starting point
- Compare bypass at a similar level while setting Amount.
The power button bypasses the effect, restoring the input without the Output trim. Stopping your DAW stops the gating, while Output still sets the level. During playback, a pattern or chain using frequency focus can keep its neutral crossover path at Amount 0%, changing phase and potentially the peaks. Patterns using Full focus throughout use the original signal path.
The ? button opens the built-in guide. The license button opens activation and account details. See Getting started for activation and downloads.
How-tos
Something unclear?Make a quarter-note pump
Something unclear?- Put gate after a sustained pad and start the DAW.
- Choose 1/4 and select a curve with a low start that rises to full level.
- Assign that colour to all four steps.
- Move the curve’s end to choose how soon the sound returns.
- Lower Amount until the pulse fits the track.
Make room for a kick without cutting the highs
Something unclear?- Select the curve you want to use for the duck.
- Choose Duck lows in Focus, and assign that curve to the relevant steps.
- Adjust the shared low / mid crossover to decide how much of the bass is shaped.
- Route the kick to gate’s sidechain input if you want its timing shown in blue.
- Adjust the curve against the reference and listen in the full mix.
The kick does not trigger the duck. Match the steps to its rhythm, or automate the pattern as needed.
Turn a short pulse into a long swell
Something unclear?- Choose a rising curve.
- Drag across several sequence pads to tie them.
- Stretch the curve across the run and adjust its bend.
- Right-click a pad to split the run if you want a separate ending.
Keep the rhythm while exploring shapes
Something unclear?- Close the sequence and Swing padlocks.
- Leave the curves padlock open.
- Duplicate the variation into an empty slot.
- Click Randomize and use Revert to compare recent rolls.
- Save the result as a preset, or chain it with the original variation.
Troubleshooting
Something unclear?I hear no gating
Something unclear?Start your DAW and confirm there is audio entering gate. Check that bypass is off and the licence is active. Raise Amount and make sure the steps actually use a shaped curve rather than sustain or another colour. Editing an unused curve does not affect the sound.
Amount or Swing is dimmed
Something unclear?Amount is inactive when the playing pattern has no curve depth to change. Assign a shaped curve, or a focused flat curve, to a step. Swing works only at 1/16.
My edits are not what I hear
Something unclear?Check Chain. You may be editing one variation while another plays. The selected slot is the edit target; the light indicates playback. Also check that the curve being edited is assigned to the steps you hear.
My sidechain does not trigger anything
Something unclear?That is expected. gate follows the DAW’s position and its own pattern; the sidechain is a visual reference only. If the trace is missing, check the DAW’s sidechain routing and turn on its trace label.
Mute still cuts the sound at 0% Amount
Something unclear?Whole-signal Mute is an explicit silence assignment. Replace it with a coloured shaped curve if you want Amount to control the depth.
For installation, missing plugins, activation or account problems, see Getting started or support.