
Explore the controls
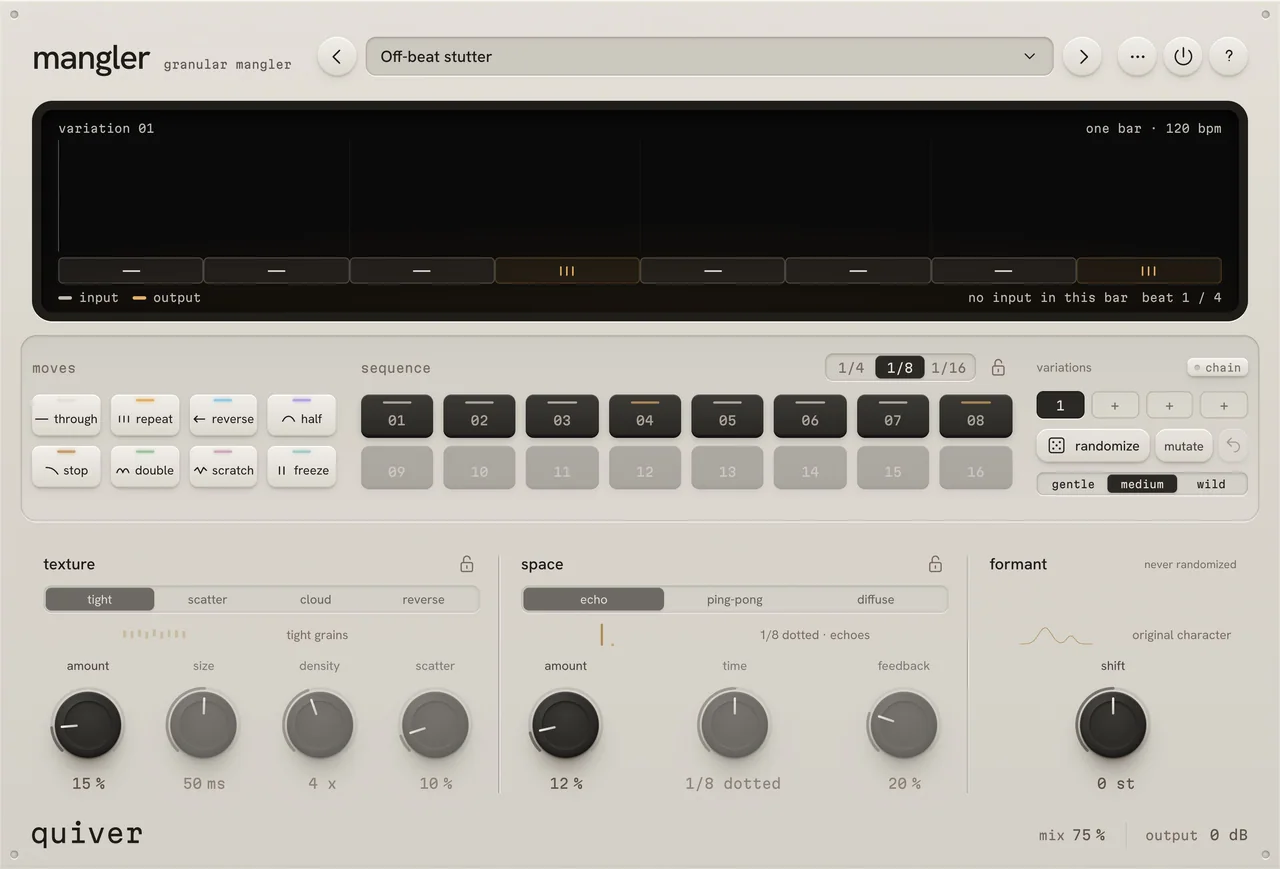 PresetsUndo / RedoBypassThroughRepeatReverseHalfStopDoubleScratchFreezeStep durationRhythm padlockMove assignmentVariationsChainRandomizeMutateRevertIntensityTexture padlockTexture characterTexture AmountSizeDensityScatterSpace padlockSpace characterSpace AmountTimeFeedbackFormant ShiftMixOutput
Every control has a reference below, including settings found in other panels.
How the sound travelsSignal flow and control paths
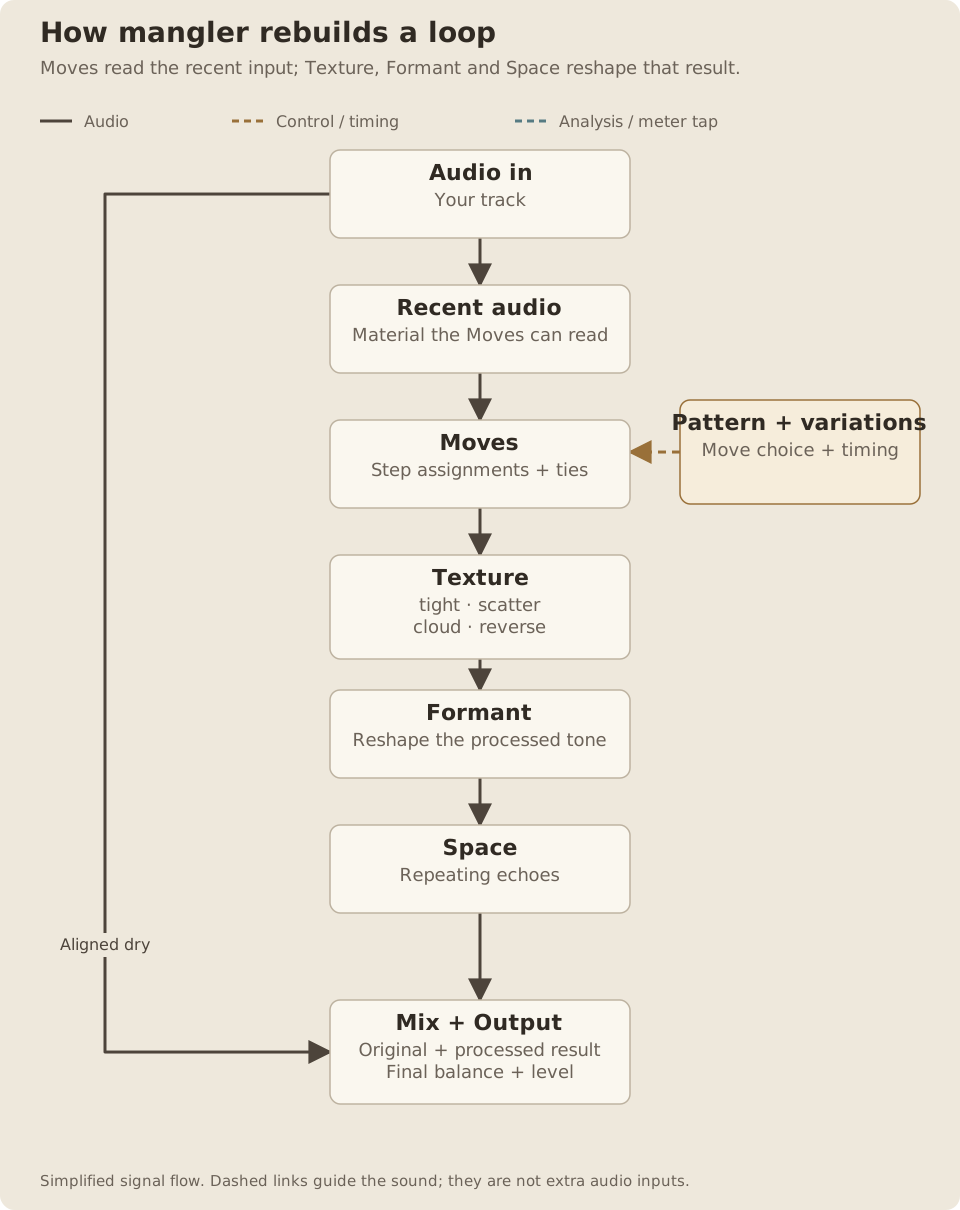
How mangler rebuilds a loop
Moves read the recent input; Texture, Formant and Space reshape that result.
Read the path
- Incoming audio fills the recent-audio memory and an aligned dry path.
- The step sequence chooses Moves that read and rearrange that memory.
- Texture processes the Moves, followed by Formant and then Space.
- Mix sets the dry/processed balance, and Output sets the final level.
- Texture comes after Moves, so it reshapes an existing repeat or reverse as well as the original music.
- Formant comes before Space.
- Output affects both dry and processed contributions. Internal ceilings protect the processed path and active final bus.
- Bypass takes the aligned dry path.
mangler is an audio effect that rearranges the music coming into it. Give the steps of a bar different moves, add grain texture and echoes, then save variations to make a longer phrase. It works on drums, vocals, instruments and complete loops.
For downloads, installation and activation, see Getting started.
Quick start
Something unclear?- Put mangler on an audio track with a loop, or after an instrument. Start playback in your DAW.
- A new instance opens on Off-beat stutter, with short repeats and a little texture and echo. Mix starts at 35%, blending that sound with your track.
- Choose repeat from the moves, then click a step to place it. Drag across several steps to turn them into one longer repeat.
- Press randomize to try another pattern. Choose gentle, medium or wild to set how far it goes.
- Use the arrow beside mutate to return to an earlier roll. Once you like the result, save it from the preset menu.
While the DAW is stopped, mangler continues at the song tempo so you can hear live input. It still needs audio coming into the track.
Interface
Something unclear?Knob reset values describe the settings used by a double-click reset. The opening preset and your saved projects can use different values.
The top row holds the preset browser, history menu, bypass and help. The large display shows the incoming and processed audio, the bar and its moves.
Below it are the eight moves, the sequence and the four variation slots. The lower panels shape Texture, Space and Formant. Mix and Output sit along the bottom.
Drag a dial up or down. Hold Shift for finer changes, or click its value and type an exact setting. Enter applies a typed value; Escape cancels it. Double-click a dial to reset it. With a dial focused, the arrow keys adjust it.
Sequence
Something unclear?Step duration
Something unclear?- Range
- 1/4, 1/8 or 1/16
- Default / reset
- Reference: 1/8
- Starting point
- Try 1/16 for a stutter at the last beat.
Choose 1/4, 1/8 or 1/16 for four, eight or sixteen steps across four quarter notes. These are three patterns: each division remembers its own moves and ties, so switching back restores the pattern you made there.
The pattern follows your DAW’s song position. Its bar is always four quarter notes, including when the DAW uses another time signature.
Assign a move
Something unclear?- Range
- Through, Repeat, Reverse, Half, Stop, Double, Scratch or Freeze
- Starting point
- Choose Repeat and assign it to the last step.
Click a move on the left, then click the steps where it should play. With no move selected, clicking a step selects its existing move. The step’s colour and symbol tell you what it does.
Right-click a step to choose its move or edit its ties. Escape clears your move selection and closes an open menu.
Tie steps into a run
Something unclear?- Range
- Runs inside one four-beat bar
- Default / reset
- Reference: untied
- Starting point
- Join four sixteenths for a one-beat Tape Stop.
Drag across steps to join them. A joined group is called a run: the move happens over that whole duration, instead of restarting at every step. For example, tying four sixteenths makes a one-beat tape stop.
Right-click to tie a step to the one before it, split a run, or untie it. A run ends at the bar line.
Slices / run
Something unclear?- Range
- 2, 4 or 8 slices
- Default / reset
- Reference: 4
- Starting point
- Try 4 slices across the last beat.
- Available when
- Shown when Repeat is selected.
When repeat is selected, choose 2, 4 or 8 under slices / run. This divides a repeat run into that many slices and repeats its first slice. The setting applies to every repeat run in the selected variation.
More slices make a faster stutter. The duration of the run matters too: four slices across one beat are faster than four slices across a whole bar.
The eight moves
Something unclear?mangler uses audio that has already come in. Moves that reach backward use the recent recording inside the effect, rather than looking ahead in the song.
Through
Something unclear?- Range
- One of eight moves
- Starting point
- Use Through to hear Texture and Space without rearranging the rhythm.
Plays the incoming music as it is. Texture, Space and Formant still apply, so through is also useful when you want those layers without rearranging the rhythm.
Repeat
Something unclear?- Range
- One of eight moves
- Starting point
- Tie the last four sixteenths and choose four slices.
Repeats the first slice of the run. Use slices / run to choose whether the run contains two, four or eight repetitions.
Reverse
Something unclear?- Range
- One of eight moves
- Starting point
- Use a one-beat run after the loop has already been playing.
- Available when
- Moves that read backward need recent incoming audio.
Plays the audio before the run backward. A longer tied run gives a longer reversed passage.
- Range
- One of eight moves
- Starting point
- Try Half for a slowed, lowered-pitch beat.
Plays at half speed from the beginning of the run. This lowers the pitch as well as slowing the music.
- Range
- One of eight moves
- Starting point
- Tie one beat for a gradual brake.
Slows down to a stop over the run, like braking a tape. Tie more steps for a longer slowdown.
Double
Something unclear?- Range
- One of eight moves
- Starting point
- Try Double on the last beat for a faster, higher-pitched turn.
- Available when
- Moves that read backward need recent incoming audio.
Plays the audio before the run at twice its original speed, raising the pitch. It repeats that passage to fill the run.
Scratch
Something unclear?- Range
- One of eight moves
- Starting point
- Use a short run for a back-and-forth interruption.
- Available when
- Moves that read backward need recent incoming audio.
Moves back and forth through the recent audio, producing a scratch. A tied run stretches the movement over a longer duration.
Freeze
Something unclear?- Range
- One of eight moves
- Starting point
- Try Freeze on the tail of a held vocal.
Holds the first moment of the run. Try it on a sustained vocal or the tail of a chord, then add Texture for a denser held sound.
Texture
Something unclear?Texture turns the result of the moves into grains: small overlapping pieces of audio. It comes after the moves, so it can soften, scatter or smear a repeat as well as the original music.
Character
Something unclear?- Range
- Tight, Scatter, Cloud or Reverse
- Default / reset
- Reference: Tight
- Starting point
- Try Cloud on a sustained vocal.
- Available when
- Texture Amount must be above 0%.
- tight uses short grains close to the present for thickness and shimmer.
- scatter reaches into earlier audio with fragments and small gaps.
- cloud makes a wider, more sustained wash of overlapping grains.
- reverse plays the individual grains backward.
Amount
Something unclear?- Range
- 0–100%
- Default / reset
- Reset: 0%; opening Off-beat stutter preset uses 15%
- Starting point
- Try 30% while comparing Texture controls.
- Available when
- Mix must be above 0% to hear the processed layer.
Sets how much grain texture is heard, from 0 to 100%. At zero the Texture layer is off. Raise this first when exploring the other Texture controls.
- Range
- 10–240 ms
- Default / reset
- Reset: 60 ms; opening Off-beat stutter preset uses 50 ms
- Starting point
- Try 40 ms for fine texture or 150 ms for longer fragments.
- Available when
- Texture Amount must be above 0%.
Sets the grain-length control from 10 to 240 ms. Short settings make the texture more finely broken; longer settings preserve longer fragments. Each character interprets this setting in its own way, so switching character can also change how long and smooth the fragments feel.
Density
Something unclear?- Range
- 1–8×
- Default / reset
- Reset: 4×
- Starting point
- Try 2× for distinct pieces or 6× for a fuller layer.
- Available when
- Texture Amount must be above 0%.
Sets how densely grains overlap, from 1 to 8×. Lower settings expose separate pieces; higher settings make the layer fuller and more continuous.
Scatter
Something unclear?- Range
- 0–100%
- Default / reset
- Reset: 10%
- Starting point
- Try 40% in Cloud to draw grains from a wider recent passage.
- Available when
- Texture Amount must be above 0%; the character changes its effect.
Sets the spread of reading positions, from 0 to 100%. Raise it for grains drawn from a wider area of the recent sound. Its effect depends on the character: scatter becomes more displaced, while cloud becomes less tied to one moment.
Texture padlock
Something unclear?- Range
- Open or locked
- Default / reset
- Reference: open
- Starting point
- Lock Texture before changing only the rhythm with Randomize.
Close the Texture padlock to keep this panel when you press randomize or mutate. You can still edit it yourself.
The controls become unavailable when Amount is zero. They can look faint at low Amount and Mix settings because their contribution is very quiet. Raise Texture Amount and Mix to hear the differences clearly, then blend them back down.
Space
Something unclear?Space adds tempo-synced echoes to the processed audio.
Character
Something unclear?- Range
- Echo, Ping-pong or Diffuse
- Default / reset
- Reference: Echo
- Starting point
- Try Ping-pong on a stereo track.
- Available when
- Space Amount must be above 0%.
- echo repeats the sound in place.
- ping-pong alternates the echoes between left and right, starting on the left. Listen in stereo to hear the movement.
- diffuse softens and spreads each repeat into a more blurred tail.
Amount
Something unclear?- Range
- 0–100%
- Default / reset
- Reset: 0%; opening Off-beat stutter preset uses 12%
- Starting point
- Try 20% for a clearly audible echo layer.
- Available when
- Mix must be above 0% to hear it.
Sets the amount of Space, from 0 to 100%. At zero the layer is off.
- Range
- 1/32, 1/16, 1/8, dotted 1/8, 1/4, dotted 1/4 or 1/2
- Default / reset
- Reference: 1/8; opening Off-beat stutter preset uses dotted 1/8
- Starting point
- Try dotted 1/8 for an off-beat echo.
- Available when
- Space Amount must be above 0%.
Sets the gap between echoes: 1/32, 1/16, 1/8, dotted 1/8, 1/4, dotted 1/4 or 1/2. These follow the DAW’s tempo. Dotted values are one and a half times the corresponding straight note.
Feedback
Something unclear?- Range
- 0–85%
- Default / reset
- Reset: 20%
- Starting point
- Start at 20%, then raise it for a longer trail.
- Available when
- Space Amount must be above 0%.
Sends part of each echo back into the delay, from 0 to 85%. Low values give a short answer; high values make a longer trail of repeats.
Space padlock
Something unclear?- Range
- Open or locked
- Default / reset
- Reference: open
- Starting point
- Lock Space before rolling new move patterns.
Close the Space padlock to keep the character, amount, time and feedback during randomize or mutate.
Time, Feedback and the character controls are unavailable while Space Amount is zero. At a low Space Amount or Mix, their effect can be difficult to hear.
Formant
Something unclear?Shift
Something unclear?- Range
- −12 to +12 semitones
- Default / reset
- Reset: 0 semitones
- Starting point
- Try −3 semitones on a vocal for a darker character.
Moves vocal character up or down without transposing the notes, from -12 to +12 semitones. Negative values sound darker; positive values sound brighter. Zero leaves the formant unchanged.
Formant is never randomized. Use it deliberately after finding a pattern you like.
Mix, Output and bypass
Something unclear?- Range
- 0–100%
- Default / reset
- Reset: 35%
- Starting point
- Start at 35%; compare 100% to hear the processing alone.
Blends your original track with the complete mangled result, from 0 to 100%. Zero gives the original input; 100% gives the processed result. A lower Mix can keep a drum groove recognizable underneath more extreme moves.
Mix is shared across all variations and is never randomized. Loading a preset sets its saved Mix, so check it when browsing.
Output
Something unclear?- Range
- −24 to +12 dB
- Default / reset
- Reset: 0 dB
- Starting point
- Adjust until bypass and processed levels are comparable.
Sets the final level, from -24 to +12 dB. Use it to fit mangler back into the track after changing the processing.
Output is shared by all variations and is never randomized. Presets recall their saved Output too.
Bypass
Something unclear?- Range
- Off or On
- Default / reset
- Reference: processing active
- Starting point
- Compare with bypass while setting Mix.
The power button at the top passes the input through without mangler’s processing. Compare it with the active effect while setting Mix and Output.
Randomize, mutate and history
Something unclear?Randomize
Something unclear?- Starting point
- Let a loop play first, then Randomize so choices can use recent audio.
Writes a new version of the selected variation. Each press auditions candidate settings against recent incoming audio and chooses a result with its level matched. Let your loop play before using it so the choices can respond to that material.
The result is an edit that you can hear, change, save and undo. Playback repeats the saved result; it does not generate a different pattern every time.
Intensity
Something unclear?- Range
- Gentle, Medium or Wild
- Default / reset
- Reference: Gentle
- Starting point
- Try Medium when exploring a loop; Gentle when preserving its groove.
- gentle keeps the downbeat and adds one or two short events, mostly repeats.
- medium keeps the downbeat while using up to two kinds of move in up to three places.
- wild uses up to three kinds in up to five places and can change the downbeat too.
Mutate
Something unclear?- Starting point
- Use Mutate after finding a result close to what you want.
Changes a little of the current variation. It can change, add or remove a move event and nudge Texture and Space values. It keeps the current characters and echo time; a Space layer that is off stays off.
Rhythm padlock
Something unclear?- Range
- Open or locked
- Default / reset
- Reference: open
- Starting point
- Lock Rhythm to explore only Texture and Space.
The lock beside Sequence keeps the rhythm during randomize or mutate. Together with the Texture and Space locks, it lets you explore one part of the sound while keeping the others.
Step duration, Formant, Mix and Output are never randomized.
Revert
Something unclear?- Range
- Last three randomizations
- Starting point
- Step back if the latest roll lost a useful phrase.
The curved arrow beside Mutate steps back through the selected variation’s last three randomizations. Loading a preset clears that roll history.
Undo and redo
Something unclear?- Starting point
- Use Undo for a control edit beyond the randomization history.
Open the three-dot history menu for undo and redo, or use Cmd+Z and Shift+Cmd+Z on Mac, Ctrl+Z and Ctrl+Shift+Z on Windows. Undo covers edits beyond just randomization, including control changes. The menu also shows transport and grain activity.
Variations and Chain
Something unclear?- Range
- Four slots; Chain Off or On
- Default / reset
- Reference: Chain Off
- Starting point
- Copy a variation, edit it, then chain both for a two-bar phrase.
Four slots hold four versions of the sound and pattern. Click a numbered slot to select it; your edits stay with that slot automatically. Click + to copy the selected variation into an empty slot.
Drag a saved variation onto another slot to copy it there. Right-click a slot to replace or remove it. A copy is independent, so changing it leaves the source alone.
Turn on chain to play saved variations in slot order, one four-beat bar each, then repeat. The order is counted from the DAW’s song position, so looping the same section returns to the same part of the chain.
Automation edits the selected variation. Mix and Output remain the same across the entire chain.
Presets and sharing
Something unclear?- Starting point
- Save a preset after setting Mix and Output; both are recalled.
Click the preset name to open the browser. The arrows beside it step through the presets. Factory groups include clean starts, chops, tape moves, grain textures, space and chained phrases.
To save your own, enter a name at the top of the browser and choose save preset. It appears under yours. With one of your presets loaded, saving under its existing name updates it; change the name to keep both versions.
A preset saves the sound, all four variations, Chain, Mix and Output. Your DAW also keeps the plugin state in its project.
Use show preset folder to find your .qpreset files. The folders are:
- Mac:
~/Library/Application Support/Quiver/mangler/Presets/User - Windows:
%APPDATA%\Quiver\mangler\Presets\User
Send a preset’s file to share it. Drop a mangler .qpreset on the plugin window to add it to yours; dropping one file also loads it. A preset made for another Quiver product cannot be loaded into mangler.
Right-click one of your presets to reveal its file or move it to the Trash or Recycle Bin. Removing the file leaves the sound currently playing intact.
How-tos
Something unclear?Put a stutter at the end of a bar
Something unclear?- Load Clean and choose 1/16.
- Select repeat and drag across the final four steps.
- Set slices / run to 4 for four repeats across the last beat, or 8 for a faster finish.
- Adjust Mix to keep as much of the original groove as you want.
- Close the rhythm padlock if you want randomize to explore Texture and Space while keeping this ending.
Make a tape stop
Something unclear?- Select stop.
- Drag across the steps where the slowdown should happen.
- Use a longer run for a gradual brake, or one step for a short interruption.
- Raise Mix to hear the stop clearly. With a low Mix, the original track continues underneath.
For fills placed across longer phrases with a drawn speed curve, see roll.
Turn a vocal into a cloud
Something unclear?- Play a vocal through mangler and choose through for the steps to begin with.
- In Texture, choose cloud and raise Amount.
- Increase Size and Density for a smoother layer; adjust Scatter for more movement.
- Choose a step or run for freeze if you want to hold a particular moment.
- Add diffuse Space and adjust Formant to change the vocal character.
Make a four-bar phrase
Something unclear?- Finish a variation, then click + to copy it.
- Change the copy or use Mutate.
- Repeat until you have the variations you want.
- Turn on Chain. Saved slots play one bar each.
- Save a preset to keep the whole phrase.
Troubleshooting
Something unclear?The effect sounds dry
Something unclear?Check bypass and Mix. Make sure audio reaches mangler. A through-only pattern with Texture and Space at zero and Formant at zero sounds unchanged. Try the Off-beat stutter preset.
If activation is required, mangler passes your audio through dry. Open the licence sheet and follow Getting started.
Texture or Space controls do nothing
Something unclear?Raise that panel’s Amount above zero. Raise Mix while comparing settings. A faint control can be active but too quiet to hear in the complete blend.
The pattern changed when I switched division
Something unclear?Each division remembers a separate grid. Return to the previous division to recover its moves and ties.
A move sounds different at the beginning of playback
Something unclear?Reverse and other backward-looking moves need recent audio. Immediately after starting, mangler uses the present sound when earlier audio is unavailable. Play from before the passage you want to capture or export.
Chain is playing a different slot from the one I selected
Something unclear?Selection decides which variation you edit. Chain decides which variation plays at the current song position. Turn Chain off to repeat the selected variation.
A preset changed the balance of my track
Something unclear?mangler presets recall Mix and Output. Set those back to the balance you want after loading.
I cannot hear the ping-pong movement
Something unclear?Listen on a stereo track and stereo output. In mono, the alternating left and right echoes combine.
For installation, licence or compatibility problems, see Getting started or contact support.