
Explore the controls


Every control has a reference below, including settings found in other panels.
How the sound travelsSignal flow and control paths
How clipper controls peaks
Clip and Mode set the clipping curve; Delta lets you hear what that path removed.
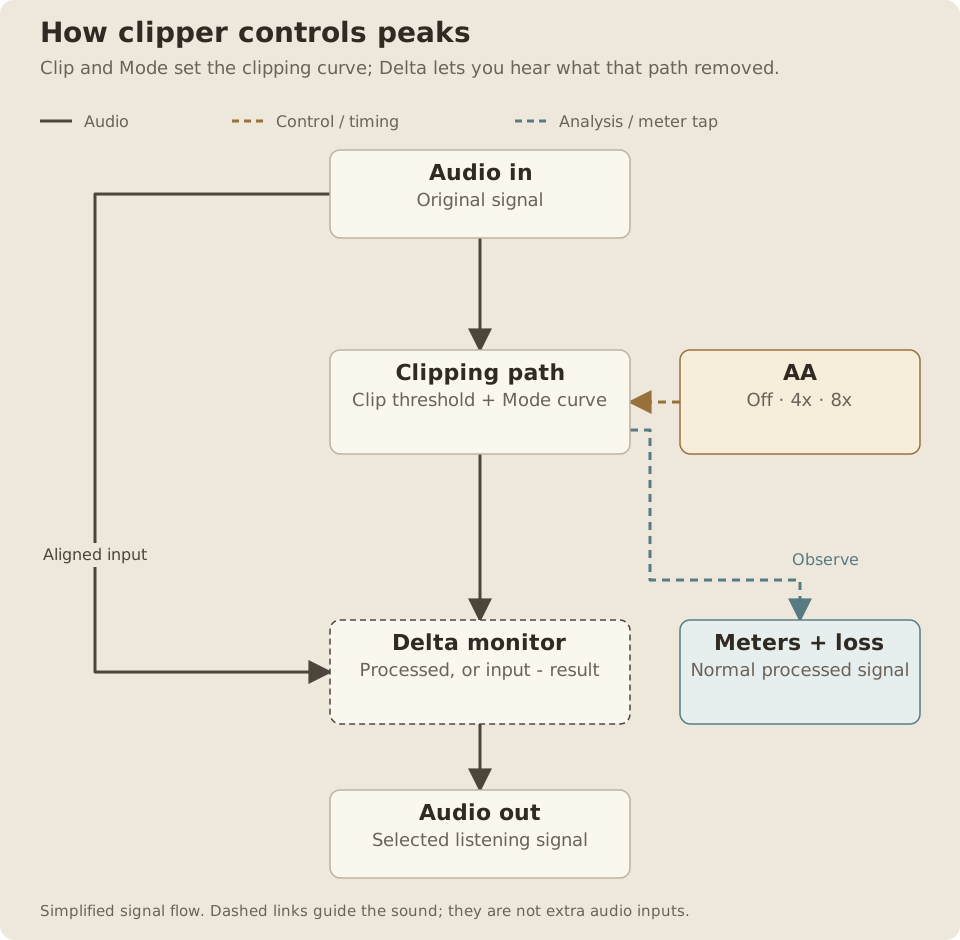
Read the path
- The input feeds the chosen clipping path and an aligned input reference.
- Clip lowers the threshold; Mode chooses its transfer curve. AA chooses Off, 4x or 8x processing.
- Delta selects the normal processed signal or aligned input minus processed signal.
- Meters continue observing the normal clipping result while Delta is auditioned.
- Clip changes how much of the incoming peak is shaped. It is not a separate final output-gain control.
- AA selects a complete clipping path and aligns its input reference; it is not simply a filter after clipping.
- Delta is input minus processed output. The loss readouts and meters stay on the normal processed path.
clipper reduces peaks and changes their shape. Its two main controls are Clip, which sets how far you push into clipping, and Mode, which chooses the character. Use the loss meters and Delta listening to judge what changes.
For installation and requirements, see Getting started.
Quick start
Something unclear?- Load clipper on an audio track, a drum bus, or after an instrument.
- Play a passage with clear peaks.
- Leave Mode on Digital and slowly raise Clip.
- Watch Peak loss and listen for the point where the sound changes too much.
- Try another Mode if you want a different transition into clipping.
- Briefly enable Delta to hear the processing difference, then turn it off to hear the full result.
The starting settings are Clip 0 dB, Digital, AA Off and Delta Off, with Signal view and Smooth display refresh. Saved Sets restore their device settings.
Clipping controls
Something unclear?- Range
- 0–36 dB
- Default / reset
- Default: 0 dB
- Starting point
- Try 3 dB in Digital mode on a drum bus and listen to the attacks.
Runs from 0 to 36 dB. Increasing Clip drives the input harder into the selected curve and applies equal inverse output gain. This lowers the effective clipping level without adding a separate makeup-gain boost.
In Digital mode, samples below the clipping level stay unchanged. Raising Clip brings that level down, so more of the signal is clipped. Other modes bend the audio more gradually and can change quieter parts too.
The line labelled Clip level follows this setting. It is a nominal clipping level, not a true-peak ceiling.
- Range
- Digital, Rounded, Cubic, Sine, Tanh, Arctan, Algebraic, Exponential, Asym, Fold
- Default / reset
- Default: Digital
- Starting point
- Compare Digital with Rounded at the same Clip setting, then readjust by ear.
Chooses one of ten characters:
- Digital: hard clipping. A useful starting point when you want to remove peaks while leaving quieter samples alone.
- Rounded: a rounded soft knee before the ceiling.
- Cubic: a curved transition into a flat ceiling.
- Sine: a sine-shaped transition into a flat ceiling.
- Tanh: smooth saturation that approaches the nominal limit.
- Arctan: a wider transition with a slower approach to the limit.
- Algebraic: another smooth saturation progression.
- Exponential: compression begins earlier in the signal’s range.
- Asym: different curves on the positive and negative halves, adding even harmonics and potentially a signal-dependent DC offset.
- Fold: wavefolding for more pronounced coloration, with reversals visible in the curve.
These modes have different loudness and different regions of unaffected audio. Equal Clip values do not give an identical amount of audible processing. Compare while listening to the same passage.
Mode changes crossfade between characters rather than sweeping through every mode in between. There is no separate Softness control in this version.
- Range
- Off, 4x or 8x
- Default / reset
- Default: Off
- Starting point
- Compare 4x against Off on bright percussion.
- Available when
- 4x and 8x add 90 samples of latency; choose before the passage.
Cycles between Off, 4x and 8x oversampling. Off adds no audio processing delay. 4x and 8x reduce aliasing and add 90 samples of delay, with a matching compensation request to Live.
Changing AA briefly fades the output while the processing changes. Set it before a performance or recording rather than switching during a held passage.
Oversampled reconstruction can produce peaks above the nominal Clip level. There is no final safety clip or true-peak guarantee. Check the downstream meter when a delivery requires a particular ceiling.
Delta
Something unclear?- Range
- Off or On
- Default / reset
- Default: Off
- Starting point
- Enable briefly to hear the difference, then return to Off.
- Available when
- Meters continue to show the processed signal.
Auditions aligned input minus processed output. In Digital mode it helps reveal the material removed around clipped peaks. In colored modes it includes all of the processing difference, including changed harmonics.
The meters continue to show the normal processed signal while you listen to Delta. Turn Delta off before judging the complete output.
Meters and display
Something unclear?Peak loss
Something unclear?Shows the largest valid difference between paired input and output sample peaks in the most recent one second. A larger loss appears immediately and falls out of the display when its one-second window expires. On desktop this is labelled 1 s max.
Use it to find how much the largest peaks have changed. It is a sample-peak measurement, rather than true peak.
RMS loss
Something unclear?Compares input and output RMS using a rolling 400 ms average. It gives a view of average energy change alongside Peak loss. It is not LUFS or automatic loudness matching.
Input and output meters
Something unclear?The desktop meters show absolute input and output levels. Darker green indicates peak and brighter green indicates RMS. Their lower display floor is −120 dBFS.
Loss measurements need usable input and output levels. At silence, an undefined loss displays — on desktop and zero in Push’s numeric readout. Reconstruction can sometimes produce a negative difference; the display retains it.
Signal view
Something unclear?- Range
- Signal or Shape
- Default / reset
- Default: Signal
- Starting point
- Use Signal to watch peak history; Shape to inspect the clipping character.
Shows 3.2 seconds of measured peak history. Gray is input, cyan is output, and amber shows the removed region. The Clip level line follows the Clip setting.
This is a series of peak windows, rather than a sample-by-sample audio waveform.
Shape view
Something unclear?Shows the selected clipping curve beside the identity line and a Digital reference. It helps compare the transition into clipping and makes Asym’s polarity difference or Fold’s reversals visible.
Smooth and Eco
Something unclear?- Range
- Smooth or Eco
- Default / reset
- Default: Smooth
- Starting point
- Use Eco if you prefer less display activity.
Changes display refresh behavior. Smooth targets a more fluid display; Eco reduces display refresh work. This control does not change the audio, measurement timing or Push fields.
How-tos
Something unclear?Trim drum peaks
Something unclear?- Choose Digital and start with Clip at 0 dB.
- Raise Clip while watching Peak loss and listening to the attack of the kick and snare.
- Compare the full result with Delta briefly enabled.
- Back off Clip if the removed material contains too much of the body or the attacks lose their character.
Use clipping as a tone effect
Something unclear?Choose a colored Mode and raise Clip until the character becomes useful. Try Asym for an uneven harmonic response or Fold for a more obvious transformation. Those modes can change much more than the tallest transient peaks, so judge the entire passage.
Compare two modes
Something unclear?Loop a representative passage, keep Clip fixed initially, and switch Mode. Watch both Peak loss and RMS loss while listening. Adjust Clip for each mode rather than assuming that the same number must sound equally strong.
Inspect what is changing
Something unclear?Use Signal for the history of input and output peaks, Shape for the selected transfer curve, and Delta for the audible difference. Turn Delta off after the comparison.
Push and Live
Something unclear?The Push positions are Clip, Mode, empty, empty, empty, empty, Peak loss, RMS loss. Clip and Mode change the sound. The two rightmost slots show Peak loss and RMS loss as readouts.
The two rightmost upper buttons are AA and Delta. Desktop additionally has the absolute input/output meters, Signal and Shape views, and the Smooth/Eco display control.
Troubleshooting
Something unclear?Clip changes but I hear very little
Something unclear?The audio may be below the clipping level, particularly in Digital mode. Watch the input meter and gradually raise Clip while a representative loud passage plays.
The full sound seems missing
Something unclear?Check Delta. When enabled, you hear the difference rather than the complete processed signal.
Peak loss and RMS loss are different
Something unclear?They measure different things over different windows. A brief sharp peak can show a large Peak loss with a smaller average-energy change. RMS loss responds to the energy of the passage across its averaging window.
Peaks exceed the Clip level with AA on
Something unclear?Reconstruction can overshoot the nominal level. clipper does not add a final safety clip after oversampling. Leave headroom and meter the output appropriate to your delivery.
There is a dip when changing AA
Something unclear?The output fades while the processing and delay change. Choose AA before the passage.
I cannot turn Peak loss on Push
Something unclear?It is a measured readout. Adjust Clip or Mode to change the processing; the readout follows the audio.