Explore the controls
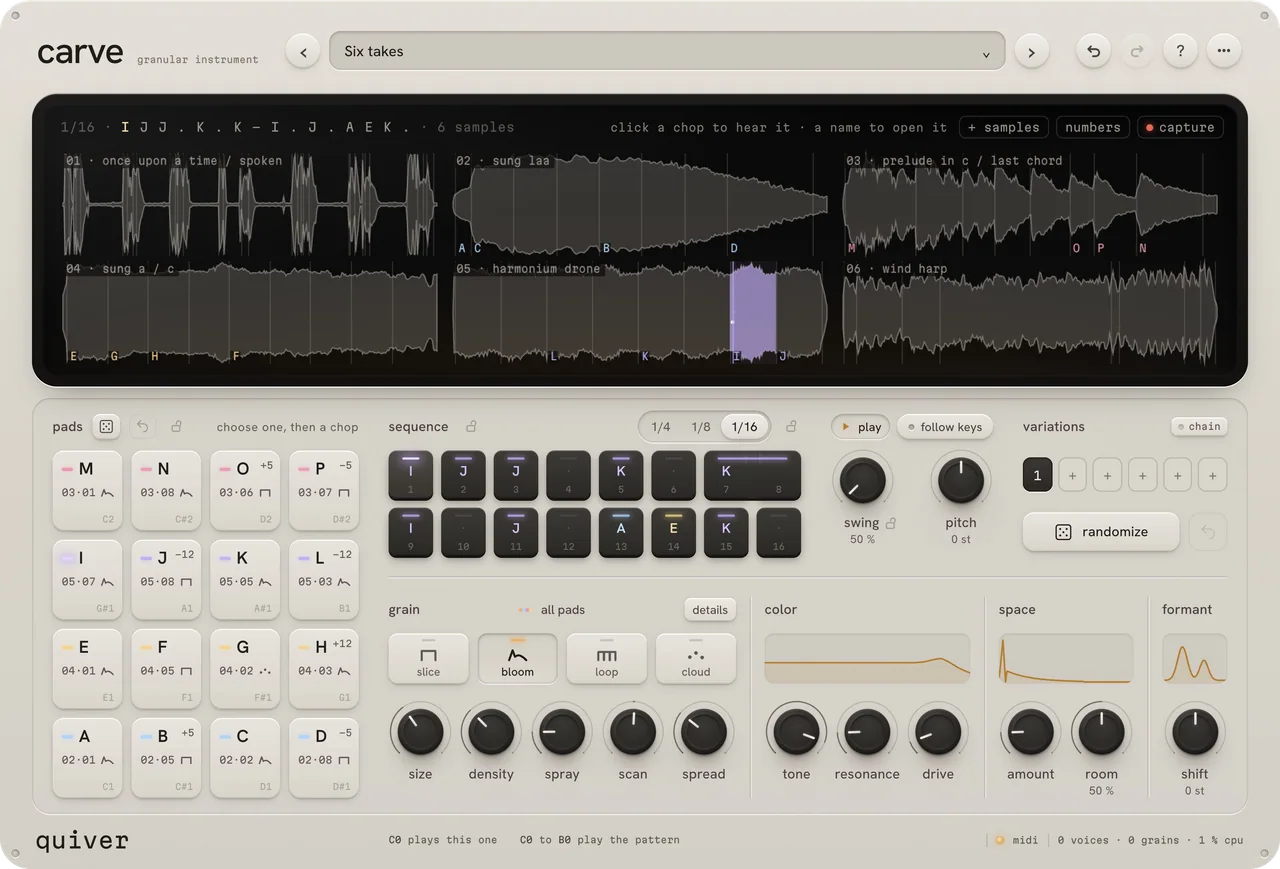 PresetsRevert / UndoMoreSamplesChop assignmentCapture / ResamplePad / all-pad selectionPads dice / Keep soundsRevert / UndoKeep soundsKeep stepsDivisionKeep divisionPlayFollow keysStep assignment / layersSwingGlobal PitchVariationsChainPattern randomizeRevert / UndoDetailsSliceBloomLoopCloudSizeDensitySprayScanSpreadToneResonanceDriveSpace AmountRoomFormant Shift
Every control has a reference below, including settings found in other panels.
How the sound travelsSignal flow and control paths
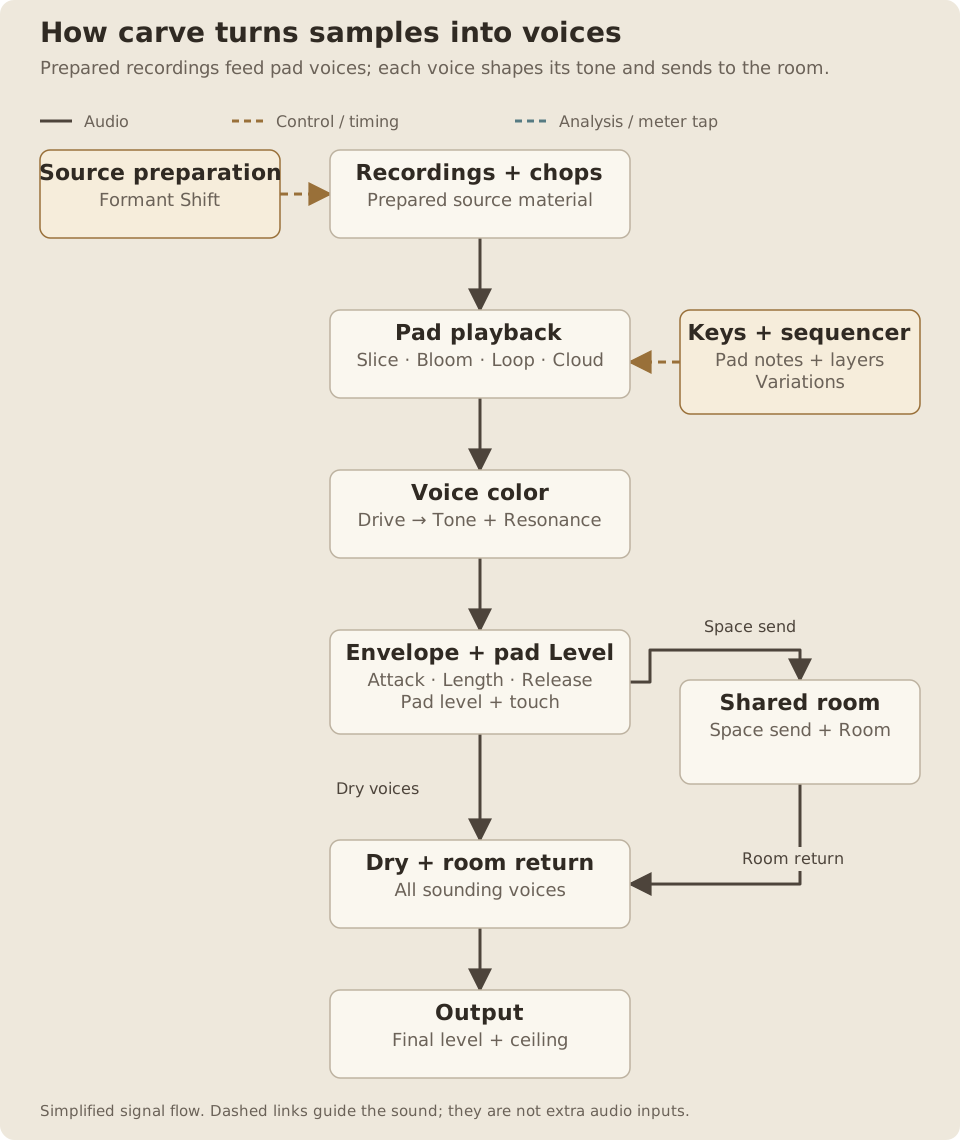
How carve turns samples into voices
Prepared recordings feed pad voices; each voice shapes its tone and sends to the room.
Read the path
- Load recordings and choose their chops. Formant Shift prepares the source material.
- Pads play those recordings as Slice, Bloom, Loop or Cloud, from keys or the sequencer.
- Drive and the resonant Tone filter shape each voice before its envelope and pad level.
- A per-pad Space send feeds the shared room. Dry voices and the room return meet before Output.
- Formant Shift prepares recordings before playback; it is not a final effect after Space.
- Drive acts before Tone, the resonant low-pass filter.
- Space is a send to the shared room. The room return joins the dry voices before the final Output level and ceiling.
- carve is an instrument: recordings and note or sequencer triggers create its sound, rather than an incoming audio track passing through it.
carve is a granular instrument built around sixteen pads. Load up to six recordings, give moments of them to the pads, and play them from a keyboard, the sequencer, or both. Every pad has its own sound and can play as a slice, bloom, loop or cloud.
For downloads, installation and activation, see Getting started.
Quick start
Something unclear?- Load carve as an instrument on a MIDI track.
- Choose a factory preset from the name at the top. Its recordings come with carve.
- Play C1 to D#2 using Live’s note names, MIDI notes 36 to 51, to hear the sixteen pads. You can also click the pads.
- Press play in carve to hear its pattern. To start it from a MIDI clip, hold a note from C0 to B0, MIDI notes 24 to 35.
- Click a pad to select it, then click a different chop on the waveform to give that sound to the pad.
- Choose slice, bloom, loop or cloud and adjust the sound controls. Save your result from the preset browser.
The note names above follow Ableton Live, where middle C, MIDI 60, is called C3. Other DAWs can use different octave names for the same MIDI notes.
Interface
Something unclear?The header holds the preset browser and its previous/next arrows, undo, redo, help and the three-dot more menu.
The large waveform display shows your recordings and their chops. A pad’s letter marks the moment it plays. The sixteen pads are on the left, the sequence and six variation slots on the right. The sound row below contains Grain, Color, Space and Formant, with details for pitch and envelope settings.
Clicking a sample’s name opens its editor in the display and its controls below. Done returns to the pad sound controls.
The footer shows licence status, MIDI activity and the number of active voices and grains. Open more > settings for Output and display preferences, and more > midi and mpe for keyboard and expression settings.
Selected pad or all pads
Something unclear?- Range
- One pad or all filled pads
- Starting point
- Select one pad while learning a sound control.
Click a pad to select and hear it. The sound row then edits that pad. Click it again to return to all pads.
With all pads selected, continuous sound controls move the pads together while preserving their different settings. The mode buttons can set all filled pads to the same way of playing. Formant and Room always affect the whole instrument.
Editing controls
Something unclear?Drag a knob up or down, hold Shift for a finer move, or use the arrow keys when it has focus. With one pad selected, double-click resets the control to its reference value. With all pads selected, double-click removes the shared offset and keeps the pads’ own settings. A control’s tooltip explains its job and range. Some controls offer a value-entry sheet when you click their value.
Controls that cannot affect the selected playback mode are dimmed. For example, a slice plays the recording straight through and does not use grain Size or Density.
Samples and chops
Something unclear?A sample is a recording. A chop is a moment between the hits or syllables carve finds in that recording. A pad points to one of those chops.
Load recordings
Something unclear?- Range
- Up to six loaded recordings
- Starting point
- Load one recording and assign its useful chops before adding more.
Drop files onto the waveform display or use + samples. WAV, AIFF, FLAC and Ogg Vorbis are supported; MP3 availability depends on the system’s decoder. You can keep up to six recordings loaded.
When a new sample is added without a specific row requested, carve redistributes the loaded samples across pads. Locked pads are kept; check the assigned pads after loading several recordings.
Dropping a recording directly on a pad requests that pad’s row of four instead. Read the message on the display when loading: it tells you which pads were assigned or replaced. Undo restores the previous assignment.
Audition or assign a chop
Something unclear?- Starting point
- Select a pad, then click a chop to give it that sound.
With no pad selected, click a chop on the waveform to hear it. With a pad selected, the same click assigns that chop to the pad. Repeat this to build your own kit.
numbers shows the chop numbers on the display. Pad colours identify their source recording; letters distinguish the pads using it.
Edit chop boundaries
Something unclear?- Range
- Inside each recording
- Starting point
- Trim a syllable around its consonant and sustained vowel.
Click a sample’s name to open it. Drag a chop’s edges to adjust the piece it contains. Alt-drag sets where the body starts. Scroll to zoom around the pointer and double-click to reset the zoom.
Shorter boundaries can isolate a consonant or drum hit. Longer ones can include a complete word, chord or decay.
Gain and Tune
Something unclear?- Range
- Gain 0–2× (mute to +6.02 dB); Tune −24 to +24 semitones
- Default / reset
- Reference: Gain 1× (0 dB); Tune 0 semitones
- Starting point
- Balance a recording at Gain 0 dB before changing its pad levels.
Gain sets this recording’s level for every pad using it. Tune transposes this recording for all those pads. Use pad Pitch when you want to change just one pad.
Root and detected note
Something unclear?- Range
- MIDI note 0–127
- Default / reset
- Reference: MIDI 60 until recording analysis sets its root
- Starting point
- Use the detected-note button, then adjust if vocal processing is tracking the wrong note.
- Available when
- Root affects flattening or formant preparation; it is not a general transpose control.
Root describes the recording’s note. The detected-note button restores carve’s detected root. Changing Root is not a general transpose control: it affects the vocal processing when pitch flattening or Formant is in use. With both at rest, the interface marks that dependency. Use Tune for a direct pitch change.
Find transients and Divide
Something unclear?- Range
- Transient detection or equal divisions
- Starting point
- Use transients for syllables; equal divisions for a regular loop.
find transients detects the recording’s hits and syllables again. divide cuts it into the selected number of equal parts instead. Use transient detection for unevenly spaced events and equal divisions for an evenly timed recording.
Changing the chops also changes what a pad’s chop number refers to. Listen to your pattern afterward and use Undo if the earlier boundaries suited it better.
Plays, Replace and Remove
Something unclear?- Range
- Enabled or disabled; replace/relink/remove actions
- Default / reset
- Reference: sample enabled
- Starting point
- Turn Plays off to compare the pattern without one recording.
plays enables or disables that recording. Pads using a disabled sample remain assigned but do not sound.
replace loads another recording into the slot. If a sample is missing, relink locates it in Mac 1.1.3. Windows 1.1.1 does not show that command. remove clears the recording and its pads; press it again when asked to confirm.
Capture and Resample output
Something unclear?- Starting point
- Capture into an empty slot to retain your original recording.
capture records carve’s own output into a chosen sample slot. Choose an empty slot to keep your existing recording, or an occupied one to replace it. Press the recording button again to stop.
In a sample’s editor, resample output records into that slot. You can then chop and play what you just made.
Pads and playback modes
Something unclear?Pads A to D run across the bottom row; M to P are across the top. Their default keys match the sixteen notes starting at C1, MIDI 36. Change the first key in MIDI settings if your controller needs a different range.
Right-click a pad for sample and chop selection, loading a sample into its row, level, its padlock or clearing it.
Slice
Something unclear?- Range
- Slice, Bloom, Loop or Cloud
- Starting point
- Use Slice for a clear chop played once.
- Available when
- Grain Size and Density are unavailable in Slice and Loop.
Plays the chop through like a sampler. Shape it with its boundaries, pitch, reverse and envelope. Grain controls are unavailable because this mode does not turn the sound into grains.
Bloom
Something unclear?- Range
- Slice, Bloom, Loop or Cloud
- Starting point
- Use Bloom to keep the real attack before sustaining grains.
Plays the original attack, then grows into grains for as long as the note is held. Use it to keep the start of a pluck or syllable while extending its body.
- Range
- Slice, Bloom, Loop or Cloud
- Starting point
- Use Loop with Sync 1/16 for a rhythmic repetition.
- Available when
- Grain Size and Density are unavailable in Slice and Loop.
Repeats a window within the chop. Open details for Position, Rate and the Sync/Free switch. Slow rates produce separate repetitions; faster rates can turn a vowel into a buzz.
A repeat stays inside its chop. If the window would run beyond the end, carve moves its start earlier rather than reading into the next chop.
Cloud
Something unclear?- Range
- Slice, Bloom, Loop or Cloud
- Starting point
- Use Cloud, held Scan and moderate Density for a sustained texture.
Starts with grains immediately, without the original attack. Hold the note for a sustained texture and use Position to choose the area it reads.
Switching modes keeps sound settings for when you return. Some saved settings can therefore become audible only in a mode that uses them.
Grain controls
Something unclear?- Range
- 2–2000 ms
- Default / reset
- Selected-pad reset: 90 ms
- Starting point
- Try 40 ms for fine grain detail or 200 ms for smoother fragments.
- Available when
- Used by Bloom and Cloud; unavailable for Slice and Loop.
Sets how long each grain lasts, from 2 ms to 2 seconds. Short grains give fine detail and more buzz; longer grains retain longer pieces of the recording. It is used by bloom and cloud. Loop takes its repeat length from Rate, so Size is unavailable there.
Density
Something unclear?- Range
- 1–800 grains per second
- Default / reset
- Selected-pad reset: 24 grains per second
- Starting point
- Try 12 grains/s for separate pieces, then 60 grains/s for overlap.
- Available when
- Used by Bloom and Cloud; Loop uses its own Rate.
Sets how many grains start per second, from 1 to 800. Low values can reveal individual grains; high values overlap into a sustained sound. Bloom and cloud use it. Loop uses its own Rate instead.
Spray
Something unclear?- Range
- 0–100%
- Default / reset
- Selected-pad reset: 1.5%
- Starting point
- Try 10% on a held vocal for movement around its chosen position.
- Available when
- Unavailable in Slice.
Moves grain reading positions randomly around the chosen position, from 0 to 100%. At low values the sound stays near one moment. Higher values pull fragments from a wider area. Slice does not use it.
- Range
- −4× to +4×; 0× is held
- Default / reset
- Selected-pad reset: +0.1×
- Starting point
- Start at held, then try +0.25× for slow travel through a recording.
- Available when
- Unavailable in Slice.
Moves the reading position through the sample, from 4× backward to 4× forward. held stays in place. Positive values move forward; negative values move backward. Use it to let a cloud travel through a recording. Slice does not use it.
Spread
Something unclear?- Range
- 0–100%
- Default / reset
- Selected-pad reset: 25%
- Starting point
- Try 50% on a Cloud pad while listening in stereo.
- Available when
- Unavailable in Slice; stereo output reveals the width.
Sets how widely grains spread between left and right, from 0 to 100%. Use a stereo output to hear the full width. Slice does not use it.
Color controls
Something unclear?- Range
- 30 Hz–22 kHz
- Default / reset
- Selected-pad reset: 18 kHz
- Starting point
- Try 4 kHz to darken a vocal pad.
A low-pass filter that controls brightness, from 30 Hz to 22 kHz. Turn it down to remove high frequencies and darken a pad. With all pads selected, it moves their tones together while keeping their differences.
Resonance
Something unclear?- Range
- 0–95%
- Default / reset
- Selected-pad reset: 15%
- Starting point
- Try 30% while moving Tone slowly.
Adds a peak around the filter’s cutoff. Raising it emphasizes a narrower part of the sound and makes Tone changes more pronounced. Its range is 0 to 95%.
Drive
Something unclear?- Range
- 0–100%
- Default / reset
- Selected-pad reset: 0%
- Starting point
- Try 15% for a denser pad, then reduce Tone if it becomes too bright.
Adds saturation before the filter, from 0 to 100%. Raise it for a denser, rougher character, then use Tone to shape the added brightness.
Space and Formant
Something unclear?Space Amount
Something unclear?- Range
- 0–100%
- Default / reset
- Reset: 20%
- Starting point
- Try 15% for a short room behind a vocal chop.
Sets how much of a pad is sent into the shared room, from 0 to 100%. A selected pad has its own send. With all pads selected, you can move their sends together.
- Range
- 0–100%
- Default / reset
- Reset: 70%
- Starting point
- Try 35% for a shorter room or 80% for a longer wash.
- Available when
- Shared by all pads; hear it with at least one pad’s Space Amount above 0%.
Sets how long the shared room rings, from 0 to 100%. It affects every pad, including when a particular pad is selected. Amount decides which pads enter that room and how strongly.
Formant Shift
Something unclear?- Range
- −12 to +12 semitones
- Default / reset
- Reset: 0 semitones
- Starting point
- Try −3 semitones for a darker vocal character.
- Available when
- Affects all recordings; changed preparations become available to new notes.
Changes vocal character without transposing the notes, from -12 to +12 semitones. It always affects all recordings. carve prepares changed recordings in the background; new notes use them when ready. The originals are kept.
At zero there is no formant shift. Use Pitch or Tune when you want to change the notes themselves.
Pad details
Something unclear?- Starting point
- Select a pad, then open Details to adjust that pad without changing the others.
Choose a pad and press details. The waveform and sequencer remain visible. done or Escape closes the panel and keeps the pad selected.
Pitch
Something unclear?- Range
- −24 to +24 semitones
- Default / reset
- Selected-pad reset: 0 semitones
- Starting point
- Try +7 semitones on one pad for a fifth above its sample.
Transposes the pad from -24 to +24 semitones relative to its sample. Other pads using that recording keep their pitches. The global Pitch control and a sequence step’s pitch can transpose it further during playback.
Level
Something unclear?- Range
- 0–100%
- Default / reset
- Selected-pad reset: 100%
- Starting point
- Try 70% on a pad that dominates the pattern.
Sets the pad’s level from 0 to 100%. Use it to balance the kit without changing the recording’s Gain for every pad.
Reverse
Something unclear?- Range
- Off or On
- Default / reset
- Selected-pad reset: Off
- Starting point
- Reverse one chop and compare its attack.
Plays the chop backward. It changes playback direction rather than moving a chop’s boundaries.
Attack
Something unclear?- Range
- 0–20 seconds
- Default / reset
- Selected-pad reset: 3 ms
- Starting point
- Try 5 ms for a defined chop or 500 ms for a swell.
Sets the note’s fade-in, from 0 to 20 seconds. Use a short attack for a clear start or a longer one for a swell.
Length
Something unclear?- Range
- 5–100% of a step or tied run
- Default / reset
- Selected-pad reset: 60%
- Starting point
- Try 50% for gaps between pattern notes.
- Available when
- Used by the sequencer; hand-played duration follows the held key.
Sets how much of a sequencer step, or tied run, the note is held, from 5 to 100%. Shorter values leave a gap before the next step. Release can continue after the held portion ends.
Length applies to pattern notes. When you play by hand, how long you hold the key decides the note’s held duration.
Release
Something unclear?- Range
- 1 ms–30 seconds
- Default / reset
- Selected-pad reset: 300 ms
- Starting point
- Try 100 ms for a tight chop or 1 second for overlapping pads.
Sets how long the note rings after it is released, from 1 ms to 30 seconds. Longer releases let pads overlap; shorter releases keep a chopped pattern tighter.
Position
Something unclear?- Range
- 0–100% of the chop
- Default / reset
- Selected-pad reset: 25%
- Starting point
- Move toward the sustained vowel after a consonant.
- Available when
- Used in Bloom, Cloud and Loop; unavailable in Slice.
Available for bloom, cloud and loop. Chooses where within the chop the grains or loop read, from its start to its end. It is especially useful for moving a loop from a consonant to the sustained vowel after it.
Rate and Sync/Free
Something unclear?- Range
- Sync: 1 bar–1/128; Free: 0.25–160 Hz
- Default / reset
- Selected-pad reset: Sync, 1/16; stored Free rate 8 Hz
- Starting point
- Try Sync 1/16 to repeat a syllable in time.
- Available when
- Available only for Loop.
Available for loop. In sync, Rate follows the song tempo, from one bar to 1/128, with dotted and triplet choices between. In free, it runs from 0.25 to 160 repeats per second, independently of tempo.
Pad padlock
Something unclear?- Range
- Open or locked
- Default / reset
- Reference: open
- Starting point
- Lock a pad you want to keep while rolling the other pads.
Close a pad’s lock to keep that whole pad when using the pads’ dice. This is different from keep sounds, which keeps sound settings while allowing new chops and modes.
Sequencer
Something unclear?Play and pattern trigger keys
Something unclear?- Range
- Play toggle; default trigger MIDI 24–35
- Default / reset
- Reference: stopped
- Starting point
- Hold MIDI 24 in a clip to run variation 1.
play, or Space while carve has keyboard focus, auditions the pattern. For playback from a MIDI clip, hold any note in the octave below the pads. By default that is C0 to B0, MIDI 24 to 35.
Those first six trigger notes, C0 to F0, also select variations 1 to 6. The pattern follows the song’s tempo and position while held. You can play pad notes over it.
Division
Something unclear?- Range
- 1/4, 1/8 or 1/16
- Default / reset
- Reference: 1/16
- Starting point
- Start at 1/16 for a one-bar sixteen-step pattern.
Choose 1/4, 1/8 or 1/16 for four, eight or sixteen steps over one four-beat bar. Each division remembers its own pattern, including layers and step pitches.
On its first visit, a division copies the current pattern to fit. Later visits recall your changes. Visit and prepare every division you want before automating switches between them.
Older saved projects can retain earlier pattern lengths and timing until you choose a division.
Assign and layer pads
Something unclear?- Range
- One main pad and up to two extra layers per step
- Starting point
- Begin with one pad per step before adding a second layer.
Choose a pad, then click steps to assign it. Repeating the assignment keeps it; use the right-click menu for a rest. With no pad selected, a step click selects the pad it plays.
Cmd-click on Mac, or Ctrl-click on Windows, with a pad selected to layer that pad over a step’s existing sound. The step’s pitch applies to its layered pads too.
Tie steps
Something unclear?- Range
- Runs inside one four-beat bar
- Default / reset
- Reference: untied
- Starting point
- Tie four sixteenths to hold a Cloud pad for one beat.
Drag across steps to merge them into one sustained run. Its pads start at the beginning and hold across the joined duration. Changes to that run affect the whole group.
Alt-click ties a step to the one before, or splits a tied step. The right-click menu also offers ties, splitting and rests. Runs end at the bar line.
Step pitch
Something unclear?- Range
- −24 to +24 semitones
- Default / reset
- Reference: 0 semitones
- Starting point
- Try +12 semitones on the last step.
Scroll over a step to move it by semitones, up to two octaves in either direction. Hold Shift for octave moves. The right-click menu offers common intervals.
Swing
Something unclear?- Range
- 50–75% shown; 50% is straight
- Default / reset
- Reset: 50%
- Starting point
- Try 58% at 1/16.
- Available when
- Available only for sixteenth-note patterns.
Delays every second sixteenth. 50% is straight and 66.7% is triplet swing; the range ends at 75%. Click its value to type a setting or choose one of the feel presets.
Swing affects sixteenth patterns. Quarter- and eighth-note patterns play straight while keeping the stored swing setting for later.
Pitch
Something unclear?- Range
- −24 to +24 semitones
- Default / reset
- Reset: 0 semitones
- Starting point
- Try −12 semitones to move the whole instrument down an octave.
The Pitch knob beside the sequencer transposes every note by -24 to +24 semitones, whether played by hand or by the pattern. This is separate from an individual pad’s Pitch and each step’s pitch.
Follow keys
Something unclear?- Range
- Off or On
- Default / reset
- Reference: Off
- Starting point
- Enable it and hold two pad keys to hear them follow the prepared rhythm.
Makes the pattern keep its rhythm but play the pads you are holding, in turn. A held pad can start the pattern in this mode. Use it to perform new sound choices over a prepared rhythm.
Variations and Chain
Something unclear?- Range
- Six slots; Chain Off or On
- Default / reset
- Reference: Chain Off
- Starting point
- Copy a variation, edit the copy, then turn Chain on.
Six slots hold six versions of the pads and pattern. Click a numbered slot to return to it; edits are remembered automatically. Click + to copy the selected variation into an empty slot.
Drag a saved slot onto another to copy it. Copies include pad sounds and all three division banks and become selected. Right-click for copying, replacing or removing a slot.
Samples and the shared room are common to the variations. Changing a sample therefore affects the variations that use it.
Turn on chain to play saved variations in slot order, one four-beat bar each, counted from the start of the song. The playing slot lights while the selected slot remains available for editing. With Chain off, the selected variation repeats.
Chain can be automated. The first six pattern trigger keys also let a MIDI clip choose the variation directly.
Randomize and padlocks
Something unclear?carve has two dice with different jobs.
Pattern randomize
Something unclear?- Starting point
- Lock Division and Swing before rolling different step choices.
randomize below the variations writes a new pattern while keeping the pads. It can change division, swing, pad choices and step pitches.
Close the locks beside steps, division or swing to keep those parts when rolling. A roll changes the saved variation; ordinary playback repeats those saved settings.
Pads’ dice
Something unclear?- Starting point
- Lock the pads you like, then roll the remaining pads.
The dice above the pads deal new chops, playback modes and pad sounds while leaving the sequence in place. With a pad selected, only that pad rolls.
The keep sounds padlock beside these dice keeps each pad’s sound settings while allowing new chops and ways to play. A pad’s own lock keeps the entire pad.
Revert and Undo
Something unclear?- Starting point
- Undo after a roll to compare with the previous pattern.
The arrow beside either dice steps back through the last three rolls of the variation in use. Header Undo goes further and also covers manual edits, including sample assignments. Redo restores an undone edit.
MIDI, MPE and Touch
Something unclear?Open more > midi and mpe.
First pad key
Something unclear?- Range
- MIDI 12–115
- Default / reset
- Reference: MIDI 36 (C1 in Live)
- Starting point
- Keep MIDI 36 for a conventional sixteen-pad drum layout.
Sets the note for pad A. The following fifteen notes play B to P. The octave immediately below remains the pattern trigger range, with its first six notes selecting variations.
Voices
Something unclear?- Range
- Poly, Mono or Legato
- Default / reset
- Reference: Poly
- Starting point
- Try Mono for one pad voice at a time.
poly allows overlapping notes. mono plays one at a time. legato is the connected, single-note mode for overlapping key presses.
- Range
- Off or On
- Default / reset
- Reference: Off
- Starting point
- Enable for an MPE controller and enable MPE in the DAW too.
MPE is off initially. Switch it on for a controller that sends separate pressure, slide and bend for each note. carve uses a lower zone: channel 1 is the master, channels 2 to 16 carry individual notes.
With MPE off, ordinary MIDI channels still play. Velocity, the mod wheel and supported channel or polyphonic aftertouch work without an MPE controller.
Bend in pads, Note bend and Master bend
Something unclear?- Range
- Bend toggle; Note bend 0–96 st; Master bend 0–48 st
- Default / reset
- Reference: Bend in pads Off; Note bend 48 st; Master bend 2 st
- Starting point
- Match the bend ranges to your controller before playing.
- Available when
- Pitch bending requires Bend in pads to be enabled.
bend in pads is off initially. Turn it on if you want pitch bend to transpose the pads.
note bend sets the per-note MPE bend range, initially 48 semitones. master bend sets the global pitch-wheel range, initially 2 semitones. Match the ranges to your controller.
Touch sources and depth
Something unclear?- Range
- Each −100 to +100%
- Default / reset
- Reference: Press +55%; Slide +15%; Strike +100%; Wheel +50%
- Starting point
- Start with the Press mapping and reduce its depth if the sound changes too far.
Touch maps four performance sources to the sound. Each has a target and a signed depth:
- press is pressure or aftertouch. Initially it controls Rate at +55%.
- slide is MPE slide, CC 74. Initially it controls Position at +15%.
- strike is note velocity. Initially it controls Level at +100%, so softer notes are quieter.
- wheel is the mod wheel, CC 1. Initially it controls Rate at +50%.
Zero depth disables the mapping. Negative depth moves the target in the opposite direction.
Touch targets
Something unclear?- Range
- Rate, Position, Size, Scan, Tone, Level, Space, Spread
- Default / reset
- Reference: Press Rate; Slide Position; Strike Level; Wheel Rate
- Starting point
- Choose Tone for Slide and move your CC74 gesture slowly.
- Available when
- Choose a destination the current pad mode can use.
Choose Rate, Position, Size, Scan, Tone, Level, Space or Spread with the target arrows. Rate makes loops repeat faster or makes grain clouds denser. The other targets follow the corresponding sound controls.
Choose a target the pad’s playback mode uses. Size cannot change a slice, for example. A normal pattern step plays at full strength without pressure; Follow keys takes velocity from the keys you hold.
Push 3
Something unclear?In Live, right-click carve’s device title and enable MPE Mode, then switch MPE on inside carve. Use Push’s MPE pad-expression mode. Its velocity becomes Strike, pressure becomes Press, and finger position sends Slide and per-note bend.
Poly Aftertouch mode can give each pad pressure but does not send MPE slide. Leave carve’s MPE off when using that mode.
Osmose
Something unclear?Choose the mpe configuration in Osmose’s External MIDI Mode. In Live, enable MPE for the MIDI input and the carve device, then enable it in carve.
The first stage of pressure is Press. Pushing deeper past the key’s click sends Slide; sideways movement bends the note when Bend in pads is enabled.
Presets, saving and sharing
Something unclear?- Starting point
- Save a .qgrain after balancing its pads and recordings.
Click the preset name or choose more > presets to browse factory and user sounds. Search matches names, descriptions and tags. The arrows beside the name step through presets.
The factory library has 48 presets in ten groups. Their recordings are included with carve.
Use save as to keep your sound and recordings as a .qgrain preset. Your presets can be renamed, saved over or moved to the Trash from the browser. Import adds a .qgrain from elsewhere; the folder command reveals your preset files.
- Mac:
~/Library/Quiver/carve/Presets - Windows:
%APPDATA%\Quiver\carve\Presets
Your recordings are included in presets and DAW projects. Factory recordings are referenced by name, so install carve’s factory content on the receiving computer too.
The orange dot beside the preset name means you changed its sound. Saving the DAW project keeps the edits and the dot; saving a preset makes those edits the new saved sound.
The browser’s Return key loads a selected result, or saves/renames when you are editing a name. Escape closes the sheet.
Settings and shortcuts
Something unclear?- Range
- Output −60 to +12 dB
- Default / reset
- Reset: Output −9 dB
- Starting point
- Start at −9 dB and lower it for dense, layered patches.
Under more > settings:
- Output sets the instrument’s final level, from -60 to +12 dB.
- visual detail chooses calm, balanced or rich display detail.
- reduced motion reduces animation.
- size chooses a window scale. You can also resize the window from its corner.
These display choices do not change the sound. The engine activity readout helps identify a demanding patch.
With carve’s window focused, a w s e d f t g y h u j k o l p play pads A to P. Space starts or stops the pattern, and 1 to 6 selects a variation. The computer keys play at a fixed velocity of 0.8 and send no pressure.
Use Cmd+Z and Shift+Cmd+Z on Mac, or Ctrl+Z and Ctrl+Shift+Z on Windows, for Undo and Redo. more > all notes off releases stuck notes.
How-tos
Something unclear?Make a vocal chop kit
Something unclear?- Drop a vocal recording on the waveform display.
- Select pad A, then click the syllable you want it to play.
- Choose slice and use Details to adjust attack, release and level.
- Repeat with other pads, using the same recording or another sample.
- Play the pads from a keyboard or assign them to sequence steps.
- Lock pads you want to keep before adding more samples or using the pads’ dice.
Hold a vowel as a playable texture
Something unclear?- Assign a sustained vowel to a pad and choose cloud.
- Open Details and move Position into the vowel’s steady part.
- Hold the pad’s MIDI note while changing Size and Density.
- Leave Scan at held for one fixed moment, or move it gently forward.
- Add Spread and Space for width and a tail.
Repeat a syllable in time
Something unclear?- Choose a pad and set its mode to loop.
- In Details, move Position to the syllable.
- Leave Sync on and choose a Rate such as 1/16.
- Hold its note by hand, or tie sequence steps to give it a longer run.
- Adjust Length and Release to control the gaps around the repetition.
Play a pattern from a Live clip
Something unclear?- Create a MIDI clip on carve’s track.
- Hold C0, MIDI 24, over the part where the pattern should run.
- Draw pad notes on MIDI 36 to 51 if you want extra hits alongside it.
- Use C0 to F0 to choose variations 1 to 6, or turn on Chain for an automatic sequence.
- Enable Follow keys when you want held pads to replace the pattern’s pad choices.
Build a phrase without losing the first idea
Something unclear?- Make a variation you like, then click + to copy it.
- Keep the pads and randomize the pattern, or keep the pattern and roll the pads’ dice.
- Use locks to protect the parts you want unchanged.
- Turn on Chain to hear the variations in order.
- Save a preset with the complete set.
Record a result back into carve
Something unclear?- Play the phrase you want to capture.
- Click capture and choose an empty sample slot.
- Start the passage, then click the recording button to stop at the end.
- Open the captured recording, find its transients or divide it evenly, and assign its moments to pads.
For processing a recording continuously on an audio track, rather than triggering its moments as notes, see mangler.
Troubleshooting
Something unclear?No sound
Something unclear?Check the licence pill, that the track receives MIDI, and that the notes reach the pad range. Make sure the pad has a chop and its source sample has plays enabled. The sequencer needs carve’s Play button or a held pattern-trigger note; starting the DAW alone does not supply a trigger note.
If the trial or offline allowance has ended, open more > license and updates. See Getting started for activation and downloads.
Only one pad changed
Something unclear?That pad was selected. Click it again to return to all pads, then use the sound controls.
Size or Density is unavailable
Something unclear?Slice does not use grains. Loop gets its repeat length and spacing from Rate. Choose bloom or cloud to use Size and Density, or use the loop’s Rate control in Details.
A sample has no pad
Something unclear?Select a pad and click a chop in that recording. A deliberate row assignment or locked pads can keep existing pad choices in place. The sample editor lists the pads currently using the recording.
A newly loaded sample changed my kit
Something unclear?New recordings can redistribute unlocked pads, or replace the requested row. Undo the load to recover the previous assignment. Lock finished pads before loading more material.
Pressure, Slide or bend does nothing
Something unclear?Check the Touch target and depth, enable MPE in both carve and the host for an MPE controller, and confirm the controller is sending the expected expression. Bend also requires bend in pads. On Osmose, Slide needs the deeper press beyond the click.
My keyboard plays the pattern instead of a pad
Something unclear?The octave below First pad key triggers the pattern. Check First pad key in MIDI settings and the actual MIDI note number, since DAWs differ in octave naming.
Notes keep ringing
Something unclear?Check Release and any long tied runs. For stuck notes, use more > all notes off. If computer keys trigger two instruments, turn off the DAW’s own computer MIDI keyboard while using carve’s shortcuts.
A preset is missing a recording
Something unclear?On Mac 1.1.3, open the named missing sample and use relink. Windows 1.1.1 does not show that command; contact support if you need help locating a missing recording. For missing factory recordings, reinstall the supplied factory content. Keep the same content installed on another computer when moving a project that uses it.
The interface is missing or looks plain on Windows
Something unclear?Install the Microsoft Edge WebView2 Evergreen Runtime, then reopen the plugin window. For installation and host setup, see Getting started.
If the problem remains, contact support with your operating system, DAW, plugin version and the steps that reproduce it.